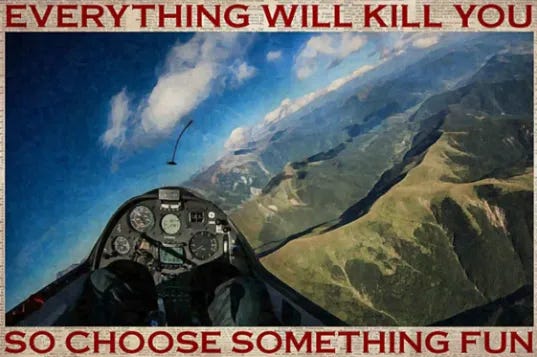
Everything Will Kill You... So Choose Something Fun
Flying gliders is the funnest thing ever.

In ten days, I’ll take my glider pilot’s license test with an FAA-designated examiner. I first learned to fly gliders 20 years ago at an old RAF field in England during grad school. I joined a club and soloed and did a couple hundred flights. The soupy weather and tight airspace restrictions in England are not conducive to soaring. Soaring is when you can stay aloft for a long time (hours) by finding rising air (lift), and even fly cross country (hundreds of miles) and back. Most of my flights were under 10 minutes. During that first stint flying gliders, I did have one thrilling flight in the southern Alps that was 6 hours and 30 minutes, but we’ll save that story for another time. I got pretty decent at launches and landings, which is the part of civil aviating with the most unforgiving consequences. I came back from England, did the whole submarine thing, got married, had kids, and didn’t spend much time flying… until earlier this Summer when I joined a local gliding club.
Glider clubs exist because it takes a gaggle of moderately skilled enthusiasts to run a glider operation. Someone has to fly the tow plane. Someone has to help hook up, launch, and retrieve gliders. It takes usually 2 people to assemble and move a glider around. It takes another person to teach and supervise these operations. Before you know it, you have 10 people of various experience levels, from ages 16 to 76 on the field. Gliding also requires fixed assets and a core of experienced people to manage them: tow plane maintenance, insurance, airworthiness inspections, grass cutting, managing relations with the airport, scheduling, billing, operations procedures, making sure all FAA regulations are complied with, safety training… etc. The expectation is everyone else helps out. Our club has 100 flying members, 2 tow planes, 8 gliders, 3 golf carts, a hanger, 2 riding lawnmowers, and a host of other accoutrements like radios, tools, and spare parts. 25 club members own gliders, which they store in trailers and assemble and disassemble each time they fly. It takes about 20-25 minutes to do so.
Before we go further, let’s clarify what gliding is and isn’t. By gliding, I mean flying a rigid wing sailplane without an engine. Here are other things that glide (along with a sailplane):
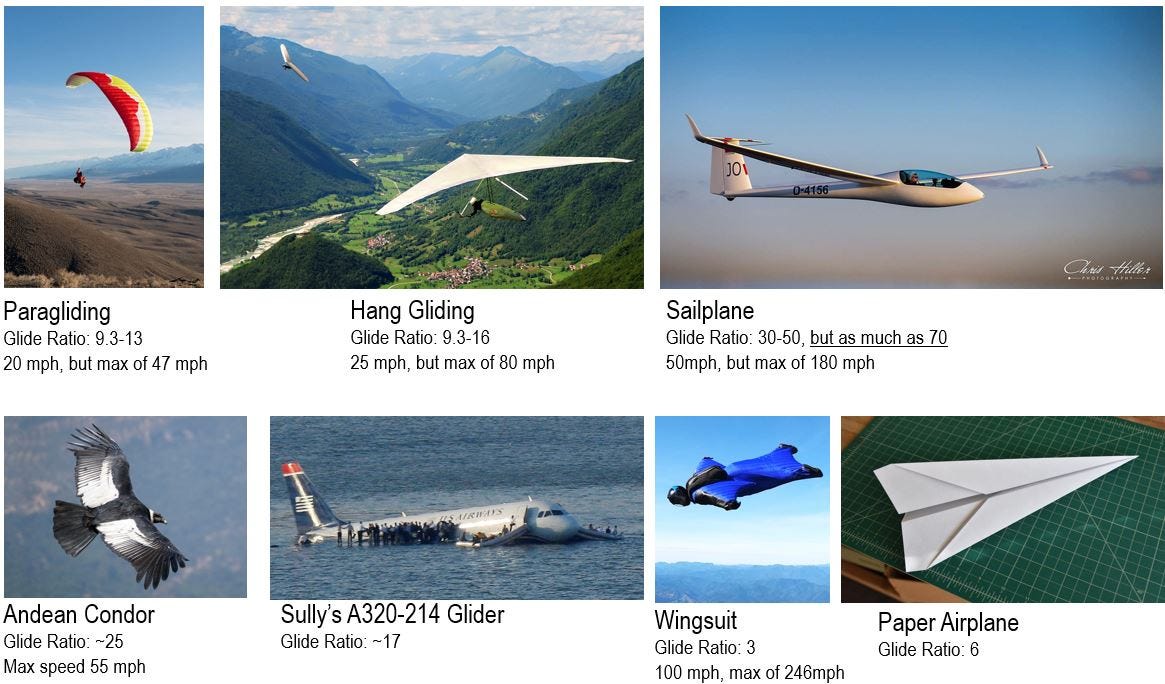
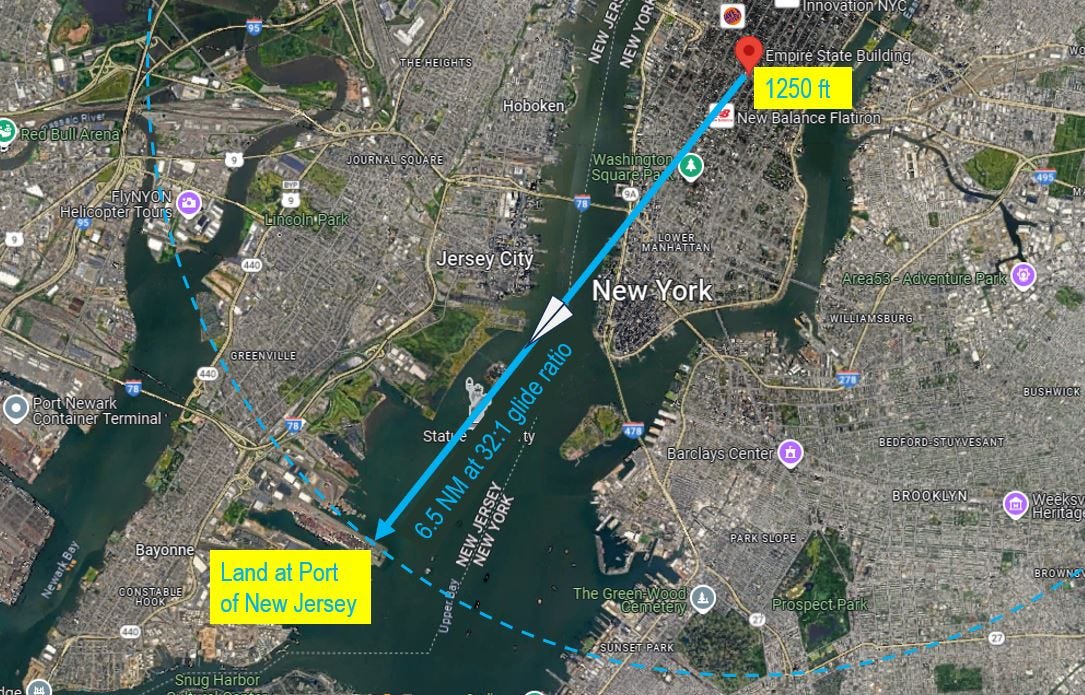
Note the glide ratios of these above. The glide ratio is how many horizontal units you go for each vertical unit high you are, in still air. For example, the sailplane I’ll be flying is the German-made Alexander Schleicher ASK-21, a two seat trainer with a glide ratio of 32:1. As sailplanes go, this is moderate performance. In still air, starting from 1000 ft above ground level, the ASK-21 can travel 32000 ft, or 5.3 nautical miles, horizontally before touching the ground, assuming it is flat. If a paper airplane had this glide performance, you could throw it from the observation deck of the Empire State Building and it would travel 6.5NM and reach the Port of New Jersey. The most advanced gliders can go twice this distance with a glide ratio of 1:75!
My British gliding ratings aren’t recognized by the US Federal Aviation Administration, so I need to get my US glider rating. It’s a good formal refresher, as I’ve taken 20 years off and am not current. The exam itself takes a few hours and involves 2 or 3 flights in a two-seat glider with the examiner in back. The examiner wants to see that I can fly safely, make good decisions, and know the rules and regulations of flying an airplane in the US. I’ve been studying the books and also practicing my flying at the airfield and on Microsoft Flight Simulator at home. This writing is about what will happen on exam day, and is a study guide. Get ready for a lot of mundane, pedestrian details… the hundreds of small tasks that need to be done well for a successful glider flight. As a hobby, gliding is so about much more than the time in the air with your hands on the control stick. It’s a window into so many realms: weather, aerospace engineering, maintenance, aviation operations, and of course, connecting with fascinating people. The gliding club brings together a multigenerational community of experts and rookies. Many of them own airplanes and about half are also power pilots. One of them was the former Chief Historian of NASA. A few others are engineering professors. Another is a documentary producer. Many are software engineers and physicists. Yes- a proper collection of nerds.
Gliding doesn’t attract thrill seekers. Glider pilots are an odd sort. Like all pilots, they are detail-oriented, self-reliant and value competence. Flying without an engine requires patience and curiosity as you watch the sky for the right conditions. There is certainly a science to flying, but staying up in a glider is an art form. Compared to the bravado of fighter pilots, glider pilots are generally reserved and understated. They are generally collegial and share knowledge to keep the club strong and the sport alive. My kind of people.
And by the way, getting my license will mean I can take guests up! I’ve been wanting to take our boys flying. I want to do so while they are still young and more easily awed and inspired. I want to take my dad up as well.
Exam minus 3 days: Complete the Cross Country Task Plan
The examiner will give me a cross-country flight to plan. Flying cross country in a glider is where the fun begins. In 2003, Klaus Ohlmann flew a Nimbus 4 glider distance of 3008 km along the Andean mountain range. Two pilots stayed up for 70 hours in a glider in 1961. The gliding community realized how silly and filthy they must have been, so duration records are no longer kept. Distance and speed records are kept and require a lot of skill. All this to say, gliders can fly long distances and stay up a long time if a pilot can take advantage of favorable conditions.
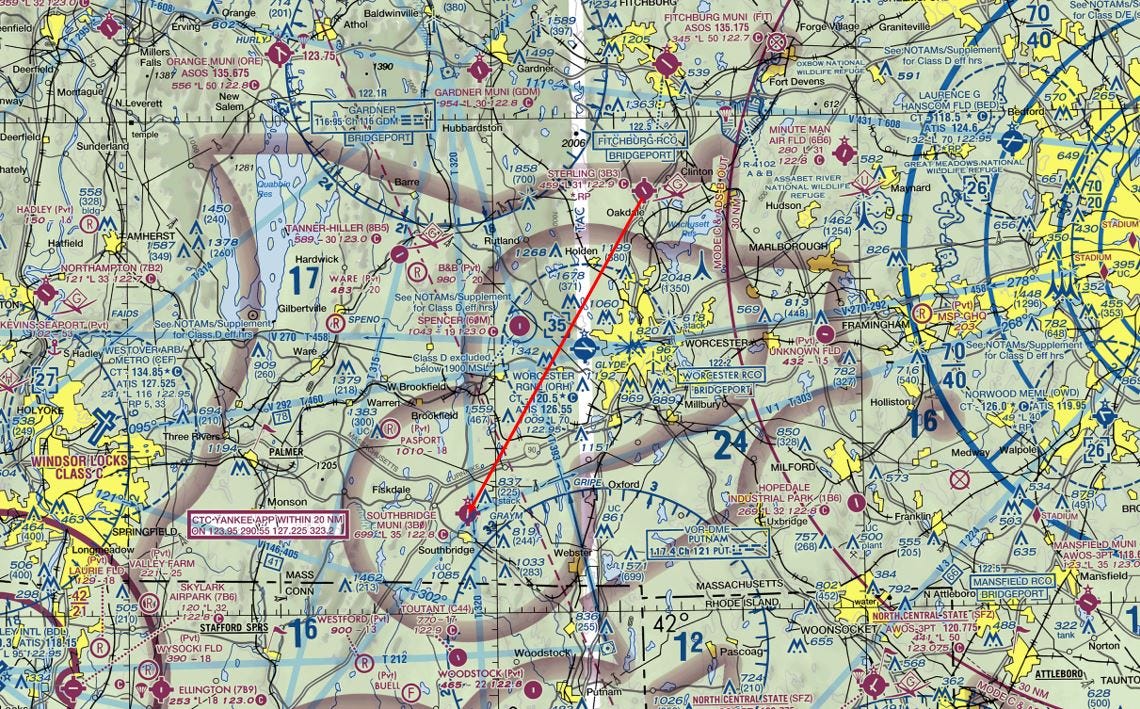
The flight I’ll plan is a 24NM flight southbound from my home airfield of Sterling(3B3) to Southbridge Municipal Airport(3B0).
Whether in a submarine, ship, airplane, or hiking on foot, the first part of the process is the same:
Figure out where you are going. I pull out the aeronautical sectional chart for the northeast US and run my finger along the track.
Figure out how far it is, and how fast you will go, and about how long it will take.
Identify the hazards along the way.
Figure out a track to avoid the hazards.
Find safe havens and escape routes to land (or anchor) in case the shit hits the fan.
Figure out the weather conditions, and how that will affect your planned journey.
Figure out when to set off to have the best conditions (avoid bad weather, tides, or thermals)
Next, I look at the terrain on the chart and google maps. I’ll fly this route in MS Flight Simulator in a zippy prop plane to see what it looks like. It’s flat, forested New England dotted with farm fields, lakes, small towns, Worcester, and highways. It will take about 15 mins with an engine, and up to 2 hrs without an engine.
Overall, the flight profile will look like this if I flew a direct line in still air:
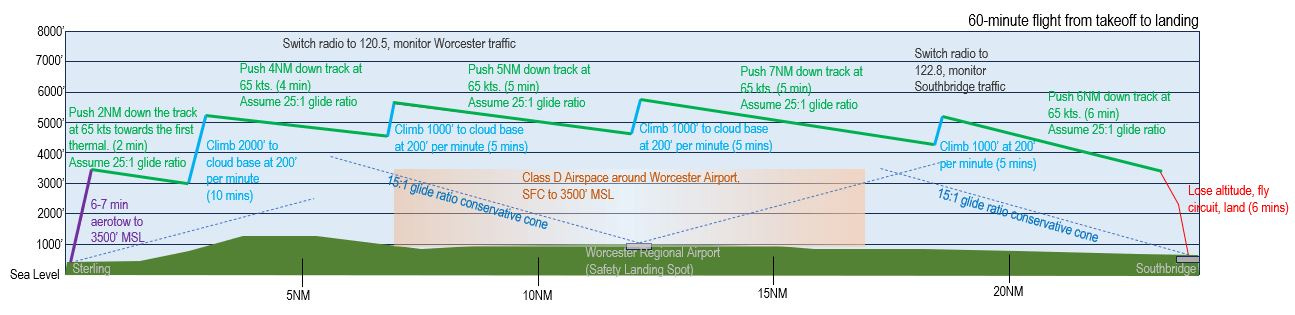
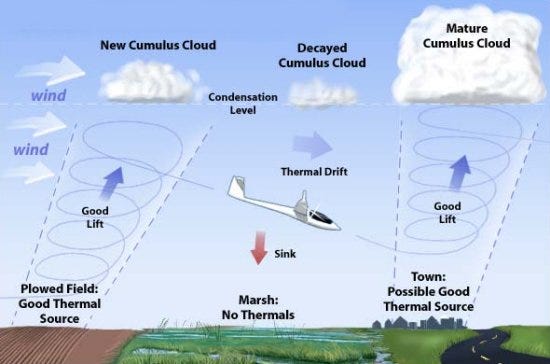
The sawtooth pattern is the typical pattern for a cross-country thermal flight. Find a thermal to spiral up in and ride this elevator up to cloud base (blue segments). Push the nose forward to increase speed and ride the sled down the hill to the next thermal (green segments). There’s a lot of theory on how to do this efficiently, and many books written on cross-country flying. If there is a headwind, all of the green sled rides will be steeper. If the cloud base is lower, the saw tooth will top out lower. If the thermals are stronger, the elevator rides will be faster.
As a new cross country pilot, I have planned for a conservative glide ratio at 15:1, half of the ASK-21’s published glide performance. If I can’t find a thermal to climb in, I might sink too low and fall out of the sky. If this happens, it is strongly preferable to land on a runway or grass strip at an airport. If that is not an option, gliders can land in farm fields, though there is risk of damage. As long as I am above the conservative glide angle cone (dotted line) to escape to Worcester, I can land there. The straight line flight in still air will take 1 hour. It’s highly unlikely for good lift to be in the direct line, so I’ll need to weave off course to find the best lift and energy lines. I expect this flight would take me 1.5-2 hours. This is an average speed of 22 kph for the task. A few weeks ago, at the 2024 Gliding World Championships in Texas, the average winning speeds were 135 kph. The best pilots race around a set task of hundreds of miles. It’s much like a sailing regatta, but with a third dimension.
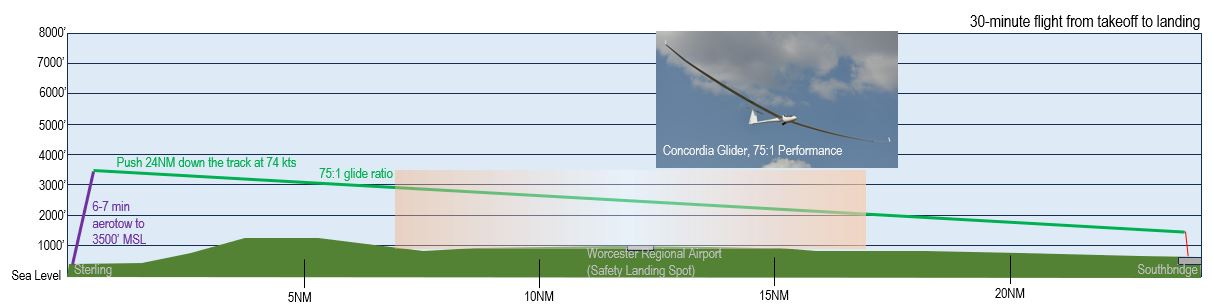
If we were to do this same 24NM task in the Concordia glider, the highest performance glider (75:1) ever to fly, it would get there in a single sled ride after releasing from tow with no need to climb in thermals.
Exam minus 2 days: Check the weather, NOTAMs, and TFRs
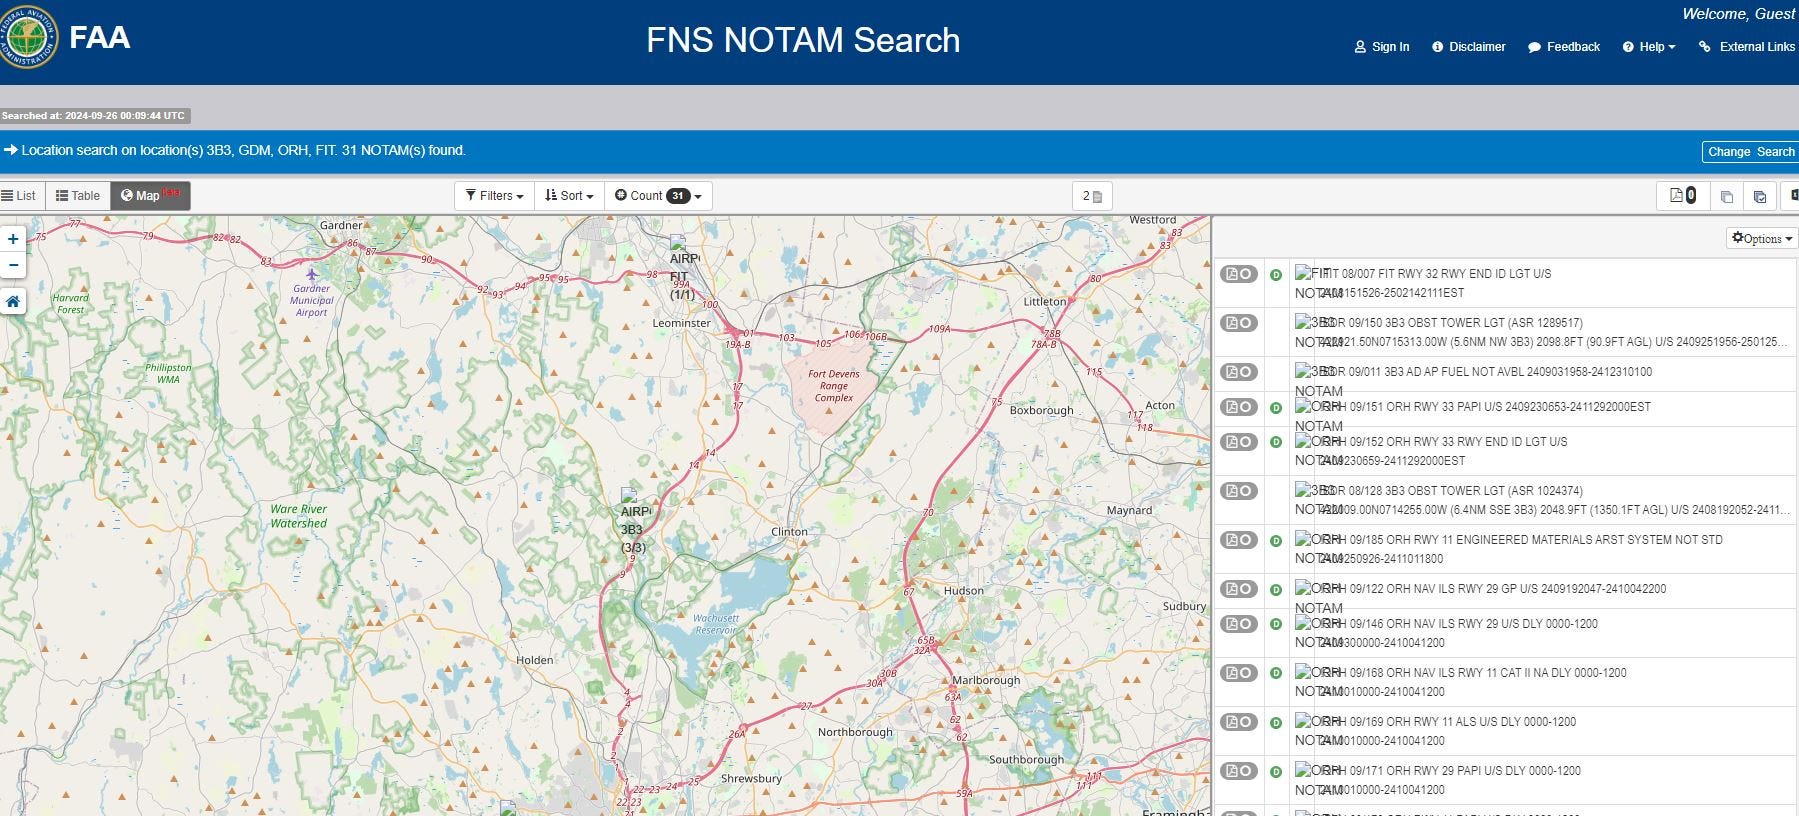
To be legal to fly any airplane, every pilot must get up-to-date weather information, and check Notice-To-Airmen (NOTAMs) and Temporary Flight Restrictions (TFRs). I do this on the FAA’s designated website. The NOTAMs are listed by airport and warn pilots of hazards or service outages (no fuel, runway repairs, lights not working etc.) The TFRs warn of airspace restrictions due to national security events like Air Force One flights, natural disasters, major sporting events etc. Violating TFR airspace restrictions earns you some combination of a visit from a Blackhawk helicopter / losing your license / paying a hefty fine / going to jail.
I check the surface weather on normal websites to check for rain or shine, but also look at more specialized sites that show winds aloft and predict thermal activity in the future. One of our club members made a website which combines raw meteorological soundings and models into a soaring forecast:

The rainbow colors show how strong the lift will be, The inset grid with the red and blue lines is a “Skew-T Log-P” diagram, taken from a weather balloon as it rises into the atmosphere to take a sounding. It shows you what an airmass column is doing by temperature and dewpoint. With it, you can see where the clouds are, and infer how good the soaring conditions are. I am learning how to read Skew-Ts and corroborate them with what I experience in the sky.
There is so much to learn about weather patterns that create lift. In short, the ideal New England thermal day is a 60-65 degree day in May or June. There is some moisture in the air, but not enough to create fog in the morning that blots out the sun. The morning sun warms up certain heat absorbing areas of the ground. These patches starts to warm the air bubble around them. There is a light breeze (<5 kts) that swirls and triggers these warm bubbles to release into the air. These warm, buoyant bubbles rise in the cooler atmosphere around them. This rising bubble, or thermal, has some moisture that eventually reaches its dew point. The water vapor condenses into a cumulus cloud, marking the thermal. When you find a thermal, the variometer in the cockpit will let you know how quickly the glider is rising with faster, higher pitched beeps. You fly a spiral pattern to center yourself in this rising thermal and ride it up to cloud base, sometimes at 600 feet per minute. These thermic conditions might last for 6-7 hours, peaking around 1pm. This video gives a good sense of finding lift.
Exam minus 1 day: Check the weather, pack my bag, get cash for the examiner, snacks, hydrate, and sleep
Glider pilots wear a floppy bucket hat like this:

It keeps your ears and forehead from getting sunburnt, but doesn’t have a bill which obstructs vision. It doesn’t have a button on top that can crack the canopy if your head hits it from turbulence. We all agree it’s stupid looking, but it works so well.
The rule is, no alcohol 8 hours before a takeoff. I’ve generally stopped drinking, partly because aviation demands alertness and good decision-making. Sailing and drinking go together. Aviation and drinking do not mix well.
Exam minus 3 hours: Drive to the Airfield, Call 1-800-WXBRIEF
It takes me an hour to drive to the airfield. About halfway through, I’ll call 1-800-WXBRIEF, a free service set up by the FAA. I’ll talk to a live agent for about 8-10 minutes to get an up-to-date briefing on the day’s weather, and any updates to TFRs or NOTAMs that might not have been published when I checked earlier that morning. I confirm that the day’s weather matches what I’ve been seeing in the forecast. I’m particularly interested in surface winds to understand take-off and landing crosswinds, and which end of the runway we will use. If the winds aloft are too strong (>10 kts), they will break up thermals and the lift will be choppy. The FAA now has a record that I’ve met my legal obligation to understand the flying conditions of the day.
Exam minus 2 hours: Preflight the Aircraft, Check the Paperwork
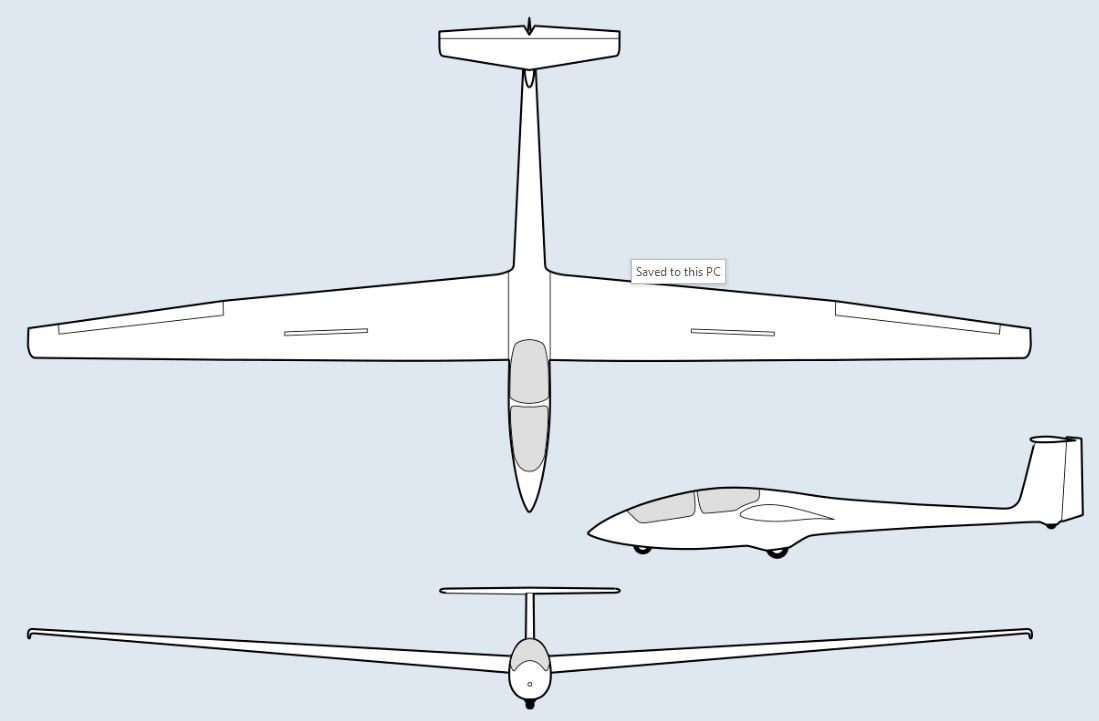
The Alexander Schleicher ASK-21 is a top of the line modern training glider. It first flew in 1979, and over 900 have been built to date. Its service life is currently rated for 18000 hours. For context, our club will fly about 400 hours on an ASK-21 in a year, so 18000 hours is a 45 year lifespan. It is made of fiberglass, including the main wing spar, which allows the 55.7 ft wingspan to support the glider’s ~1150 lb take-off weight. An ASK-21 costs about $140,000 new, but they hold their value well if taken care of. Modern gliders should not be left out in the sun and rain for the fiberglass’ epoxy to break down in UV rays.
Before the first flight of each day, a qualified pilot must pre-flight the aircraft. It takes me 20 minutes to get through the checklist.
Take the canopy covers off. Open up the canopy. Plug in the battery and strap it down inside the left wing root.
With the help of 2 others, roll the glider out of the hanger onto the tarmac. This allows us to inspect all surfaces of the glider.
Check the canopy struts and gas springs, and put my fingers on the nuts which secure them. Check the canopy locking pins and handles.
Inspect both the front and rear cockpits for any unusual items. Sometimes mice will make their home in a glider left outside, or eat through cushions. I check the straps and five-point harness. During a recent annual inspection, multiple wasp nests were found in the inside of the fuselage of a glider that lives outside.
Power up the glider with the main switch, check that the radio and variometer power on.
Check the controls by moving the control stick in a box in both directions, and push both rudder pedals to confirm that the control cables and linkages are moving properly and freely. Pull the airbrake handle out and feel the resistance as the main wheel disk brakes activate at the end of its travel.
I walk slowly around the glider, scanning the surface for cracks or dents. I check that the pitot tube (which measures airspeed) is clear, as are the static pressure ports which feed the altimeter, airspeed indicator, and variometer. I look at the control surfaces, tires, linkages. I grab the wingtip and rock the wing up and down a few times to see that both wings flex together at the frequency that I expect after doing it hundreds of times. A structural problem with the wing spar might reveal itself during this flex.

The flex test to make sure they don’t fall off. Most importantly, I grab another pilot to do positive control checks. I move the controls from the cockpit as he or she puts hands on each control surface to confirm proper movement. If the control linkages are not connected properly and detach, it would be much better to find out now than at 800 ft.
I clean the canopy with a microfiber cloth if it has sunscreen fingerprints or smudges.

I take this pre-flight ritual as seriously as rigging the submarine for dive. The entire submarine crew is trusting you to check that valves and systems are ready for the boat to go underwater. The dozen people who will fly this ASK-21 will trust that I’ve done this pre-flight correctly.
We tow it to the flight line with a golf cart.
Exam minus 1 hour: Discuss the plan with the Day’s Field Operations Coordinator and Tow Pilot, and my instructor
They know that I have my check ride today and will make sure I get priority in the launch line.
Exam Starts: Ground Knowledge Exam
The instructor will ask a variety of questions and may ask me to pre-flight the glider. He’ll ask me questions about glider design, calculating weight and balance, and how the glider works. We’ll review the legal paperwork and maintenance logs for the glider. We’ll review the cross country flight planning assignment above. He’ll ask me about the weather conditions, and what to expect for the day. We’ll talk about local airport procedures.

+ 45 minutes: Get the Glider on the Flight Line
Get into the glider
The straps should already be adjusted. Help the examiner in, and make sure he is settled.
“I am starting the pre-flight checklist. Are you strapped in and ready?”
“Controls” Move the control stick in a clockwise box, then counter clockwise while shifting the rudder pedals. Feel for any resistance in the control cables. Open the airbrake to full travel, feel the wheel brake engage, then return to forward and locked position. “Controls are free and clear.”
“Ballast - My weight is 155 lbs, above the 154 lb minimum front seat weight. What is your weight please?” (Expect somewhere around 180 lbs). “That is within the 154 - 242 lb weight range for the back seat. We are within weight and ballast limits.”
“Straps- my straps are tight and secure - yours?”
“Instruments - airspeed is zero. Varios are at zero. Altimeter is set to 460 ft field elevation. Radio is on 122.9. Magnetic compass is pointing correctly to 330 degrees. Your instruments?”
“Flaps - the K-21 does not have flaps.”
“Trim - set to slightly forward of neutral for takeoff.”
“Canopy - Please shut your canopy first, and I’ll lock my canopy after yours is locked… The canopy is down and locked.” (I shut my ventilation window and open my small air vent.)
“Brakes” I try to pull them out and expect resistance. The examiner may try to open them without me noticing, and I’ll push them forward to confirm they are locked. Taking off with airbrakes open is dangerous and will spoil the lift over the wing. “Airbrakes are forward and locked.”
“Emergency Procedures - there is a 5 knot headwind, and a 3 knot left crosswind. If I release at the cross taxi-way, I can land forward, by may need to do a ground loop to the right to stop. At 200 ft AGL (Above Ground Level), depending on position, I will decide if I can turn left for a 180 degree back to the field to land with a 5 knot tailwind. Above 500 ft I will turn back towards the airfield and determine if I can complete an abbreviated left circuit, turning base early and landing down the field.”
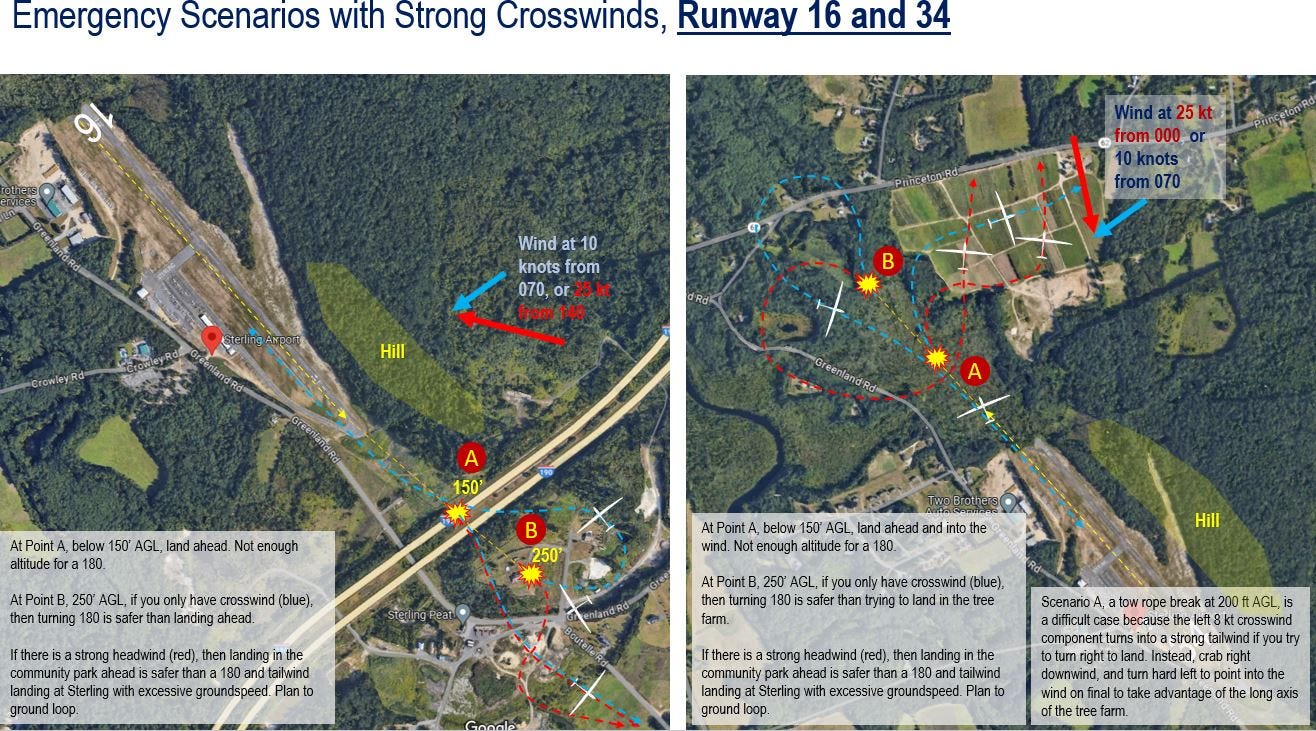
This is the last item in the pre-take off checklist, and worth a detour. Accidents do happen in gliding, and usually during take-off or landing. Most emergencies happen near the ground. Take-off accidents occur 20% of the time, and is usually the result of an unlocked canopy opening, or airbrakes deploying. Landing accidents account for 60% of gliding accidents. The rest happen in the air, and very few are collisions with other aircraft. One emergency is if the tow rope breaks during the climb, or if the tow plane loses engine power. This is known as a premature termination of the tow (PT3), and the pilot must react decisively. This means thinking through all of the scenarios ahead of time. I put this diagram together to analyze what I would do and why for rope breaks at different points during the launch. Here is the standard procedure:

Turning also increases sink rate. It’s critical to maintain flying speed and don’t let the glider get too slow when you are close to the ground. The tendency is to want to pull up to avoid trees. Many gliders have entered unrecoverable spins when turning too close to the ground.
We also have to consider the wind, and how that would affect our standard recovery plans. It all comes down to altitude and position at the time of the rope break, and how you will drift with the wind during your recovery maneuver. There are a couple land out fields beyond the runway that are not great. One is a tree farm with sparse rows of 7 ft trees. The other is a lumpy field of tall grass, slightly uphill. If you need to land in one of these fields, the glider will likely be damaged beyond repair, but the pilot would walk away. Landing on thick treetops or low shrubs is not a bad option. The branches will cushion the glider and act as a bed of springs. The glider usually suffers scratches, but is recoverable. The pilot should not attempt to unbuckle and climb down. Wait for the fire department.

Given all these factors, I’ve worked out that the worst case is a low (200ft) rope break on a day with a strong (15-20 knot) crosswind coming from the left but mostly down the runway. This makes it dangerous to try a 180 degree turn and land with a strong tailwind. The left crosswind also makes it difficult to turn right into the emergency field and land with a strong tailwind. See below for the best option. I’ve flown this simulation hundreds of times on Microsoft Flight Simulator using the ASK-21, flying out of Sterling Airport (3B3), with the worst case wind conditions above. I can only land it safely about 75% percent of the time. Therefore, I would not fly on a day like this. Make chairs instead.


Even though the chance of a rope break is highly unlikely, I need to be ready for it every time. Part of this paranoia was from learning to fly at the RAF field where we were hurled into the air by winch launching, not tow planes. A stationary winch at one end of the field would reel in a 3000 ft steel cable as the glider would get flung into the air, climbing at 45 degrees. It was a ride, but the tow cable would break occasionally, and pilots frequently trained for this.
Let’s get back to the exam.
+ 1 hour: Takeoff for First Flight
“I am the pilot in command. I have the flight controls. Are you ready for launch?”
I direct the wing runner to hook up the tow rope. I inspect it for the correct TOST hook, and look at the small loop 2 ft from the end to indicate that the tow rope eye has not slipped from its splice. The wing runner asks, “Canopy down and locked? Airbrakes forward and locked?” I check both and give the thumbs up as he raises the wing and gives the signal to the tow pilot to slowly taxi forward and take out slack.
The wing runner checks that the pattern is clear. I wag my rudder to acknowledge and signal that I’m ready for launch. The tow plane throttles up and we start rolling. I put in slight rudder correction to stay straight, and pull back gently until we are about 2 ft off the ground. We stay in this position until the towplane builds up enough speed and starts to climb. My eyes are fixed on the tail of the tow plane.
About 30 seconds after takeoff, I glance at the altimeter, and it is around 600 ft (MSL). A few seconds later, it passes 640 ft' and I call out “200 ft” and assess my position in case of a rope break emergency. I see the emergency field pass by my right, and feel some light turbulence, which means there might be some thermals on this flight.
I’m focused on one thing: maintaining proper tow position. I keep the main wheels of the Pawnee towplane on the horizon, and make small corrections to stay directly behind the towplane. I call out “500 ft” and reassess our position. At this point, slight relief as we now have some altitude (and time) in case of an emergency. It takes about 3 minutes to climb to 2000 ft AGL, during which time I radio to the tow pilot, “16P, glider under tow, request to box the wake at 2000 ft AGL.” He responds with affirmative. At 2000 ft AGL, the towplane flies in straight, I start boxing the wake. This is a maneuver to demonstrate precision flying and absolute control of the glider.
Still under tow, I descend down and the glider starts shaking. I’m flying through the prop wash and vortex turbulence generated by the towplane wings. It stops as I reach the low tow position. I turn left, and bring the glider to the lower left corner of the box, approximately 30 ft to the left of low tow center. I leave the glider there for a moment, then ascend to the top left of the box. After I hit all four corners, I go back to low tow, then ascend back to high tow position. “16P, glider under tow. Completed boxing the wake.”
Boxing the wake took 90 seconds, and we’re approaching my release altitude of 3000 ft AGL. I look over to the right to look for traffic. It’s clear. I pull the release, and spot the cable falling away. “Ropes away.” I pull up and to the right, banking and turning about 60 degrees. The tow plane dives and turns left towards the airfield. I trim the glider for 49 knots. I start a shallow turn to the right until I see the airfield. I scan for traffic. “The airfield is at 2 o’clock. Tow plane is at 3 o’clock low. No other traffic sighted.”
3000 ft AGL, and I have 1800 ft to play with until I need to start my landing pattern. 200 ft / minute, that’s 9 minutes of flying time, assuming I find no lift (or sink). “I’ll start with a clearing turn, then do a straight ahead stall.” I turn 90 degrees left, 25 degrees bank, looking around left and below for traffic. I turn 180 degrees to the right scanning for traffic. I’m in clear airspace. I pull back on the stick gently at first, then all the way back. The glider starts to buffet as the slipstream goes quiet. The glider pitches forward and the ground fills the windscreen. We’re pointing about 40 degrees down, and I pull back moderately on the stick as we feel about 2 Gs and accelerate to 90 knots. This is fine, as the glider doesn’t break until 150 knots (the Velocity Never Exceed) speed.
“Next, an incipient spin, starting to the left.” I turn left at 20 degrees bank, as if I’m turning onto final. I purposely keep the speed low, and start pulling back on the stick. The glider starts to buffet and then drops the left wing. I ease back on the stick, restore flying speed, and recover. The ASK-21 is inherently balanced and stable and will not enter a full spin without special weights installed in the tail.
These stalls took about 400 ft of altitude, and I have about 6 minutes left to play before starting the landing circuit. The instructor says, “let’s do some steep turns.”
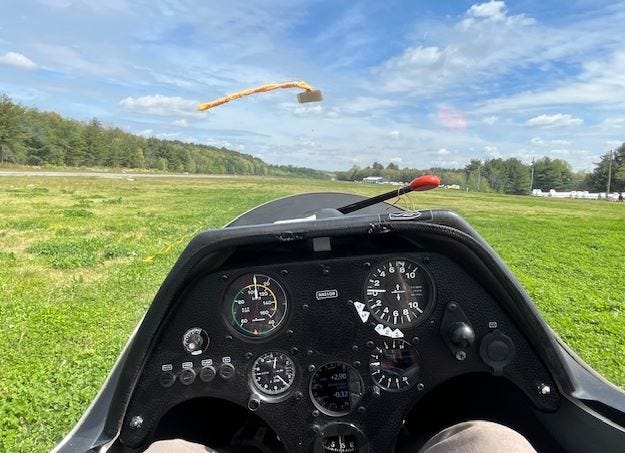
I push the stick forward slightly, drop the nose a few degrees, and trim for 55 knots. I roll left and apply left rudder until we’re at a 45 degree bank, and maintain airspeed at 55 knots, keeping my eye on where the horizon meets the dashboard. I look at the yaw string (a piece of yarn taped to the canopy) which tells me that I’m flying in a coordinated turn and not slipping or skidding. The noise is pointed in the direction of flight throughout the turn. I reverse direction, and now fly a 45 degree banked turn to the right, glancing down at my speed to ensure I’m at 55 knots. Gliders generally do climbing turns in thermals at 45 degree bank.
The instructor says. “Good, let’s level out and head for that mountain to the north.” He’s trying to test my situational awareness. I reply: “We need to stay close to the airfield. I’m heading towards the initial point and will start the pre-landing checks.”
“Undercarriage- the K-21 has a fixed undercarriage.”
“Flaps - are not fitted in the K-21”
“Speed - for today, our approach speed will be 55 knots, as we have an 8 knot headwind.”
“Trim - Trimming for 54 knots.”
“Airbrakes” I pull them out, feel the glider slow down, and see that they deploy from both wings. I put them away and lock them.
“Lookout” I scan for traffic and look at the activity on the field. “I see gliders on the strip and the towplane is taxiing back. I see no other aircraft in the pattern” as I look forward and the right for powered aircraft traffic or other gliders.
“Pre-landing checks complete.” I monitor airspeed to make sure I stay at 54 knots. This is crucial, as dropping 3 knots below is failing this exam.
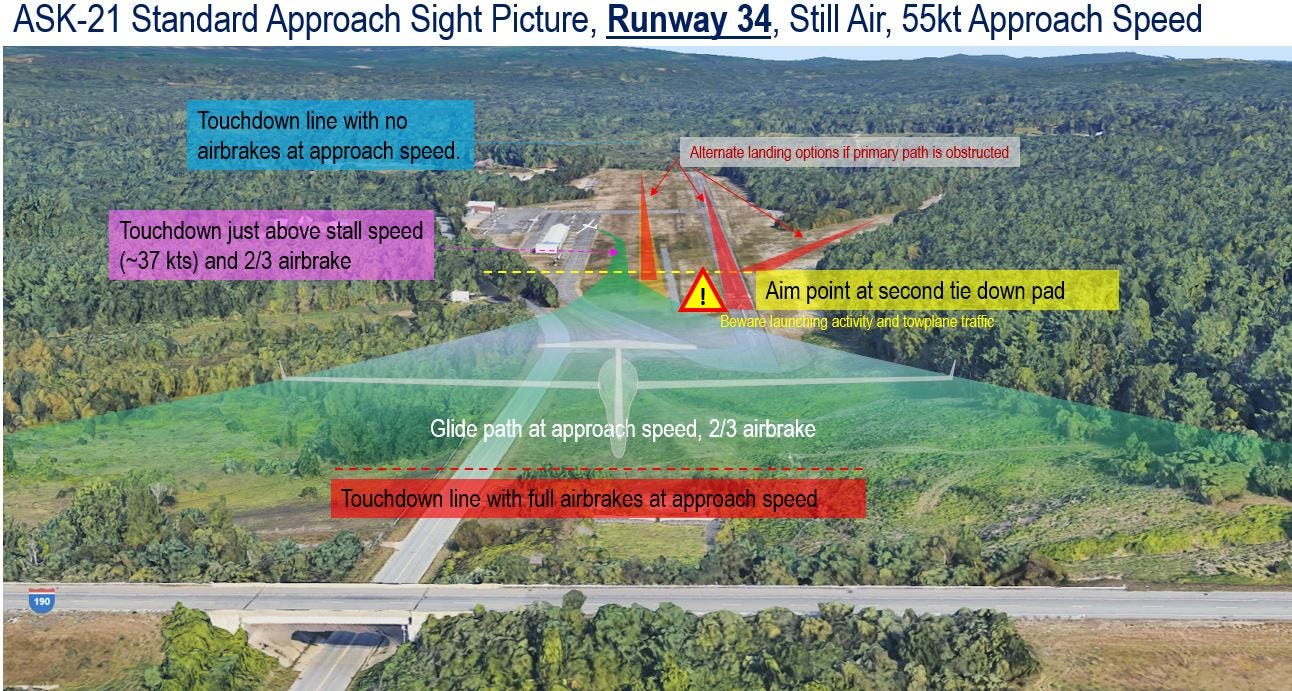
Landing a glider is unique. Unlike powered aircraft, you get one chance. The theory is simple: you start out with about 50 knots of kinetic energy and 1200 ft of potential energy, and you want to bleed both of them down to zero within a 3000 ft runway.
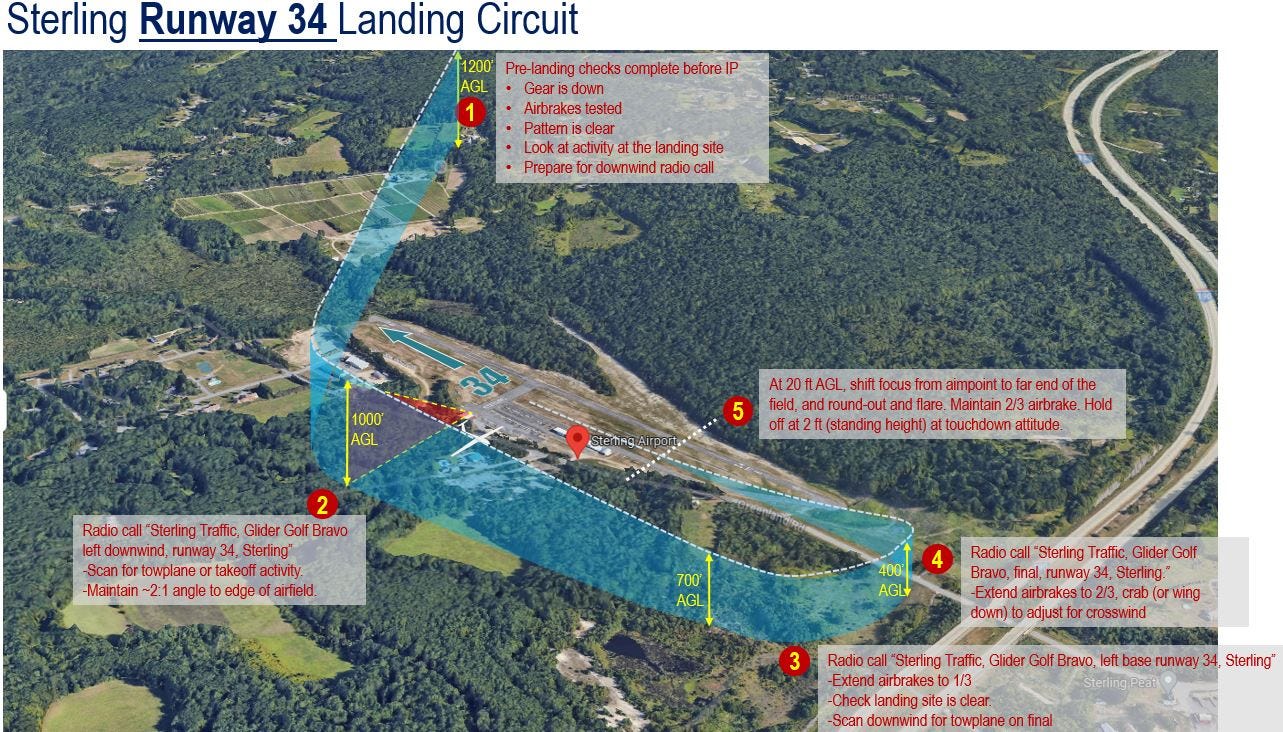
I fly over the horse farm initial point and turn right to fly perpendicular to runway 34. “Sterling traffic, glider K1, left crosswind, 34, on the grass, Sterling.” I continue to scan for traffic. My altitude reads 1500 ft MSL, right on track. Speed is 54 knots. Once I get to the creek, I turn left.
“Sterling traffic, glider K1, left downwind, 34, Sterling.” I deploy airbrakes and pitch down slightly to maintain 54 knots. I’m looking left to check my vertical angle to the airfield. I deploy my airbrakes to 2/3 to lose some altitude and start my turn onto base around 600 ft AGL.
The turn onto the base leg is what determines a controlled final approach. If I turn too early, I’ll come in too hot and overshoot the landing spot. If I turn too late, I might not make the airfield, or come in dangerously low. I look over my shoulder and see my touchdown point. I know what the vertical angle needs to look like. I start the turn as I cross the highway.
“Sterling Traffic, glider K1, left base, 34, Sterling.” I glance at my speed and altitude, and then start the turn onto final. The key now is speed control and a steady glide angle to my aim point.
“Glider K1, on final.” I pull the airbrakes to 1/2, monitor speed, and look at the sight picture to see if I’m above or below my desired glide path. I put the brakes in slightly, then pull them back out to 1/2 for the final approach and roundout. The glider is pointed down around a 15 degree angle, 54 knots, 1/2 airbrake deployed. I get close to the ground, I shift my focus to the end of the runway and gradually pull back on the stick. If done correctly, the glider will float 1 ft above the grass, bleed speed due to the airbrakes, lose lift, and touch done gently. Grease the landing, as they say. I keep flying the plane on the ground to keep the wingtips from catching the grass, and pull the wheel brake gently. I roll to a stop 50 ft from the cross-taxiway, demonstrating that I can land and stop precisely if I needed to land in a short farm field.
We unbuckle our straps, open the canopy, and climb out to push our glider off the runway. The golf cart is already waiting to retrieve us. I hook up the tow rope and walk the wing. The examiner won’t give me any feedback, but we’ll both know if it was a good landing or not. We’ll put the glider back in the launch line and have 30 mins before our next launch. He’ll probably make some notes and ask me a variety of questions like:
What are the rules for joining a thermal with other gliders already in it?
Describe how to fly in ridge lift.
Describe wave flying. When do you need oxygen per the FAA rules?
What must you do prior to entering class C airspace in a glider?
What does a PPL-G license allow you to do?
What does it mean if the towplane rocks his wings?
By this time, I expect the examiner has already decided if I’ve passed or failed. There are specific standards spelled out that I have to meet. We’ll do another flight or two to confirm that I’m consistent in my airmanship, but he’s seen enough pilots to know who is ready to be a licensed glider pilot-in-command (PIC). If I get in to an accident shortly after he’s passed me for my license, he will have to answer to the FAA, as will my instructor for stating that I was ready to take this test.
Conclusion
I’m just getting started! This whole post was about the mechanics of getting into the air and back down safely in a glider. A future post will describe the art of how to read the sky and adventure beyond the gliding range of my home airfield.
I look around the field and see pilots in their 70s, retired, and having flown gliders for 30-40 years. They are surrounded by friends in the club, passing along their knowledge and skills to the next generation like me. Many of them have several thousands of hours in gliding and fly thousands of cross country miles a year. Most are not professional pilots, but hobbyists like me. If you’ve made it this far, let’s end with a story…
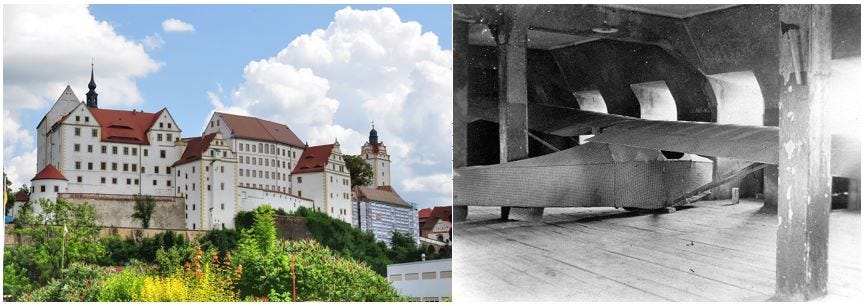
In the winter of 1944, hundreds of British and American flying officers were POWs at OFLAG-IV-C, known as Colditz Castle. Colditz was thought to be a maximum security prison. As such, allied POWs who had already tried to escape once were sent to Colditz. What shenanigans happen when you concentrate a bunch of daring, determined and clever escapees?
One of them, Lt. Tony Rolt, discovered that there was a section of the steep roof line that the German guards couldn’t see. Others found a way into the attic. Two others, Bill Goldfinch and Jack Best, decided to take advantage of this and build an escape glider in the attic. With twelve accomplices, they build a false wall to hide their workshop.
Over the next few months, they scrounged materials. Per wikipedia:
“Over thirty ribs had to be constructed (around a third being structural compression ribs), predominantly formed from bed slats, but also from every other piece of wood the POWs could surreptitiously obtain. The wing spars were constructed from floor boards. Control wires were made from electrical wiring in unused portions of the castle. A glider expert, Lorne Welch, was asked to review the stress diagrams and calculations made by Goldfinch.
Prison sleeping bags of blue and white checked cotton were used to skin the glider, and German ration millet was boiled and used as a form of dope to seal the cloth pores.[6] The completed glider weighed 240 lb (109 kg)… the glider was to be launched using a pulley system based on a falling metal bathtub full of concrete, using a gravity-assisted acceleration to 30 mph (50 km/h)”
The plan was that two pilots would glide across the Mulde River below to warn approaching American troops if the prisoners were about to be executed by the SS. The glider was almost finished in April 1945 when the Castle was liberated by American units. Nonetheless, a replica of the “Colditz Cock” was built and successfully flown in 1999 with Best, Goldfinch, and a dozen other former POWs in attendance.