
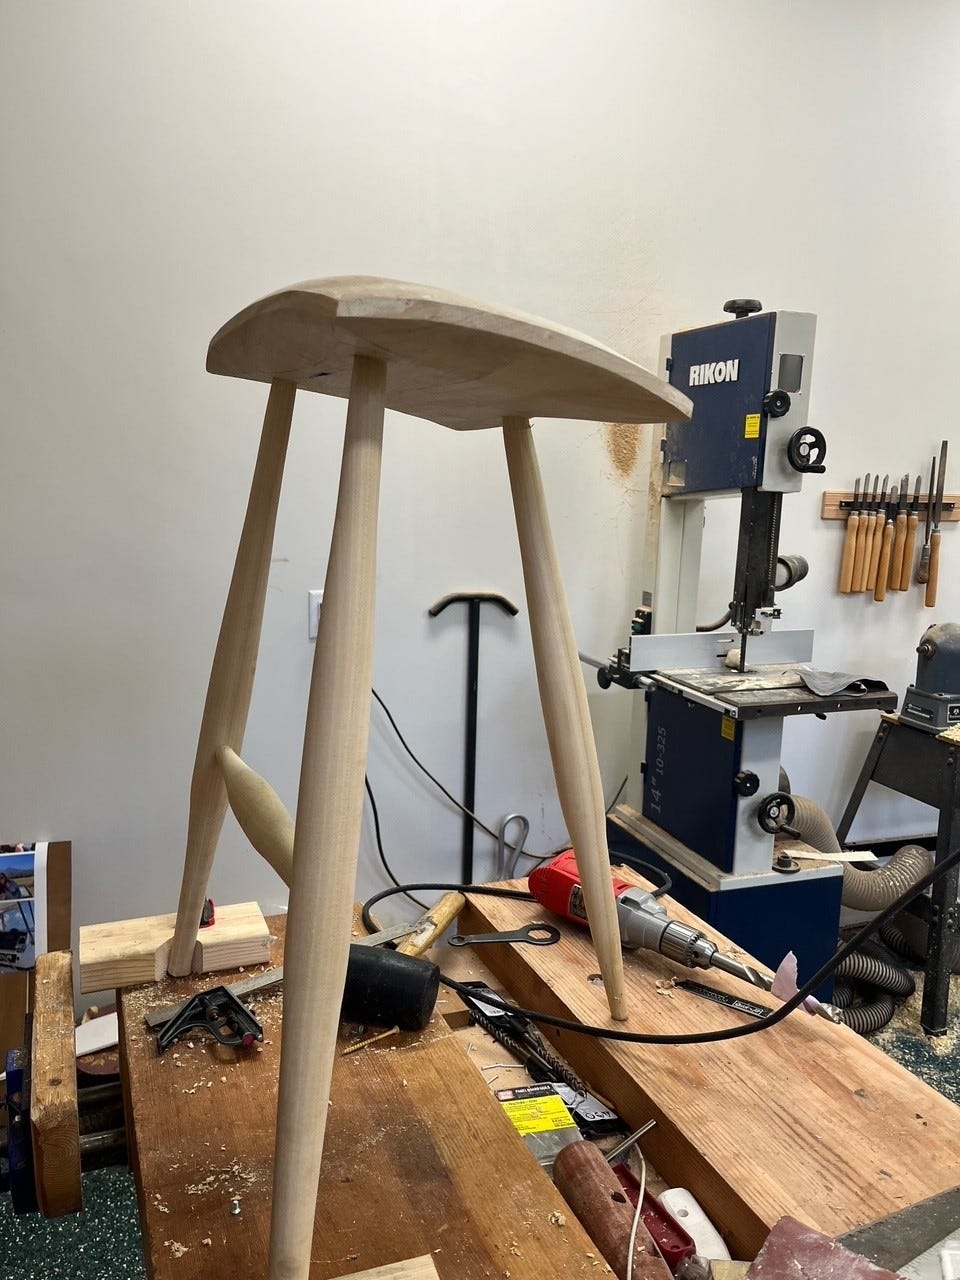
This past weekend, I finished up my first chair that I built in my home shop with my own tools and hands. It’s a modern take on the Windsor-style stool, designed by Peter Galbert. Here it is:
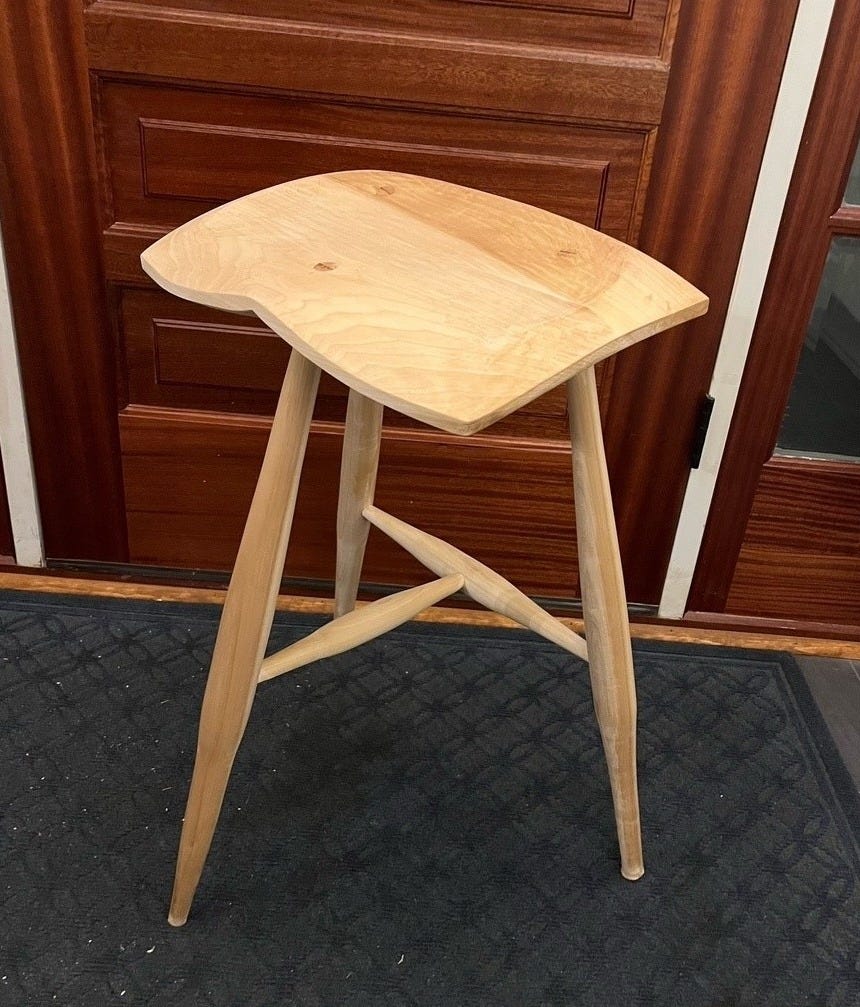
It is comfortable to sit on. It is solid enough to last such that one of our boys might say to their kids, “I remember when your grandpa built that.” It took me about 9 months start-to-finish, but if I were to build another one, it would take a 3-day weekend working 8 hours a day. I brought this chair to my office at work and wheeled my Herman Miller Aeron chair out. By sitting in this stool in the coming weeks and months, my butt will have some ideas for what makes a more comfortable chair.
This is a perch stool, designed by master chairmaker Peter Galbert. It offers much improved ergonomics compared to the 90-90-90 position which Herman Miller has made a fortune on with their Aeron chairs. Do not believe the bunk that Big Chair lobby is trying to push on you. While it is nice to adjust armrests, seat heights, and back rest position, it is fundamentally not the way we should be sitting. Galen Cranz summarizes the shortcomings of the typical office chair and sitting lifestyle here.
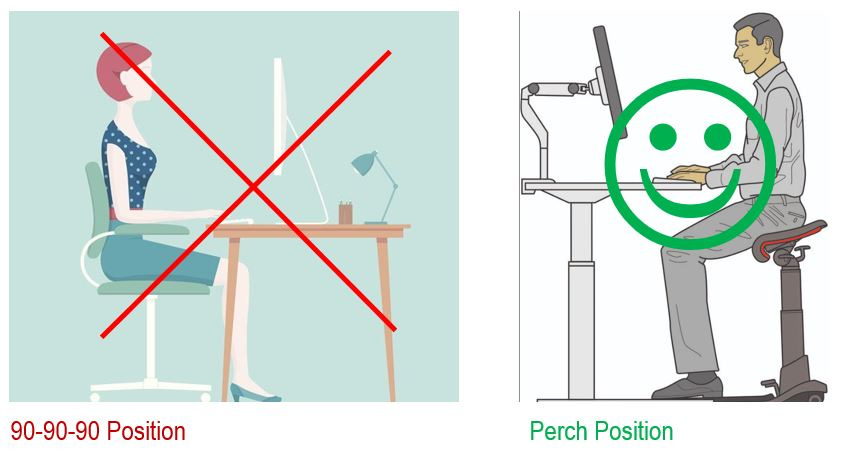
The 90-90-90 position puts a large strain where your spine meets your pelvis, and also cuts off circulation to your large butt muscles. This can lead to “dead butt syndrome” as reported in the NYTimes this week. In short, humans did not evolve to sit squarely in chairs for most of daylight. Doing so over time causes all sorts of lower back and knee problems due to having weak and atrophied butt muscles. The perch stool solves this by sloping the seat forward and distributing much of your bodyweight onto your feet. You actively use your butt and thigh muscles and core to stay balanced, but not enough to get tired. You put less torso weight squarely on your pelvis and naturally sit up straighter because it’s less effort to do so. You slouch less. There’s no back to slump into. The perch stool height needs to be adjusted to the sitter, but there are plenty of modern options out there.
I was enamored by the graceful lines of Galbert’s design, as well its comfort the first time I sat in it. Anytime I see something I like made of wood, my next thought is, I will figure out how to build it… in time.
This post will start from the finished chair and work our way back to the tree. We will take a few detours into tools and technique. I’m pleased with this first chair less because of how it turned out, but more because of what I learned. I invite you to join me on this journey… which is always more fun than the destination.
Step 10. Finishing
For the seat, I applied one coat of Tried and True, an all-natural paste mixture made of linseed oil pressed from flax seeds, beeswax, and varnish resin made from tree sap. I dip two fingers of a rag and swipe up a nickel-sized paste and start polishing. It’s like polishing a shoe back at the Academy. I rub the oil into the grain and burnish the surface. Eventually, the surface takes a sheen as the wax, sap and oil fill in all the gaps in the grain, and I press down any high spots. Finishing wood furniture is when the wood comes to life. Colors and grain pop. The green and tan of the poplar deepen into a gold and brown. The whispy grain lines take on more contrast. You can see the growth rings and flow of the wood and the tree it came from. The seat needs to look good but also be durable. I spend most of my time polishing the seat. I apply Watco Danish oil to the legs, which need some protection, but will adopt a patina over time from shoe heel marks, and moving it around. Danish oil is an all-natural syrupy mix of boiled linseed oil and varnish with some mineral spirits. It’s easy to apply by wiping on in coats and penetrates into the fibers.
Workmanship errors, scratches, stray glue drops, and unfinished spots also pop when the oil-wax finish is applied. Here are the things that I notice every time I look at the chair:
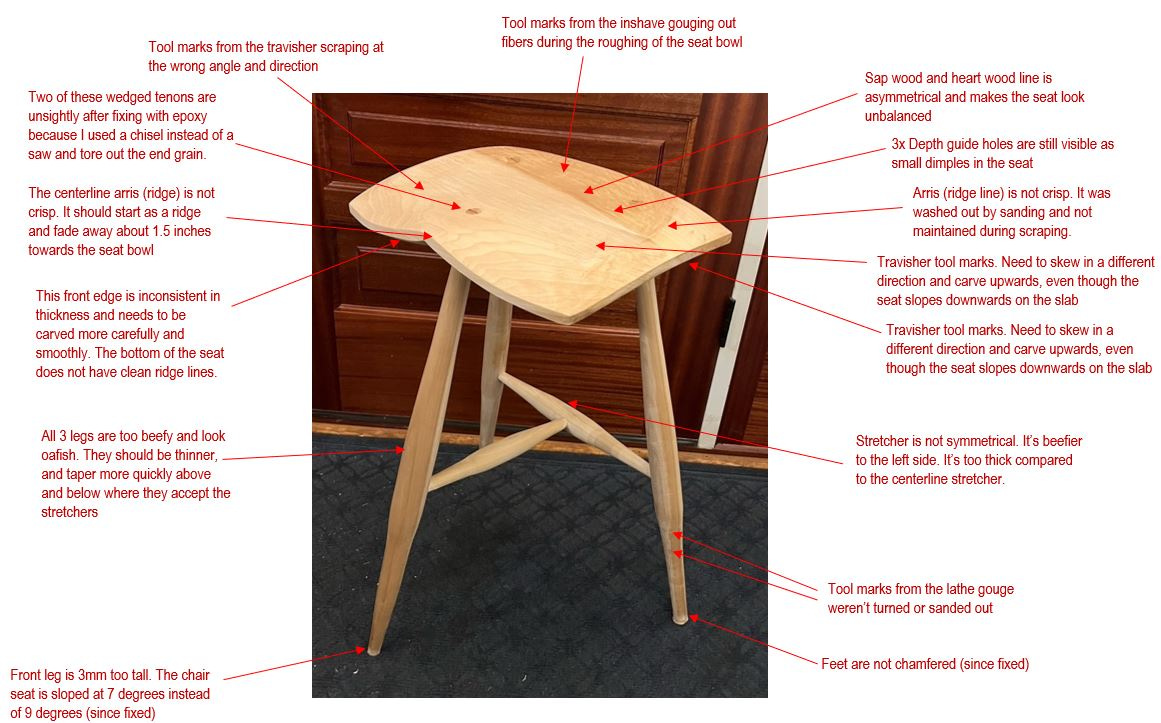
By the end of a project, I’m impatient to apply the finish and think that the last 3 hours of sanding and surface prep must lead to perfection. Alas, it never is. What’s done is done. After all the scratches and dings reveal themselves with the first coat of finish, I don’t have the patience at this point to unfinish this piece by sanding it down. I’ll take the learnings and make improvements on the next one.
Step 9: Fine Sculpting and Surface Preparation
This is step can drag on, and usually ends when I’ve had enough and say “good enough” before applying oil. I look at each area and ask these questions:
Is the shape and geometry correct? If not, then I use a spokeshave on the convex areas, or a travisher on the concave areas. These tools take shavings and still need the next 2 steps.
Is the surface free of tool marks? A straight or curved cabinet scraper shaves off grain layers. A cabinet scraper is a thin steel card the size of an index card. It has a 90 degree edge sharped by a file, diamond plate, and a burnisher. A scraper has a sharp 90 degree edge that is honed to 4000 grit. This is finer than any sandpaper, and in theory, should produce a surface that is ready for finish. Scraping requires skill to scrape in the correct grain direction. If you don’t go in the right direction, the scraper will chatter over the surface and make unsightly tool marks. The scraper is also useful for sharpening ridge lines (arrises) that bring out the contour of the seat. This is something I need to practice. (Note the arris is the thin ridge line around the butt bowl in the picture below, and also the ridge where the crotch is.
Is the surface consistently smooth and ready to take a finish? As I’m not skilled with the scraper yet, I use 200, 400, 600 and 800 grit sand paper with curved sanding blocks. This works pretty well for soft woods like poplar that already have a smooth surface. It will take out light tool marks like soft scraper chatters.
Step 8: Final Assembly
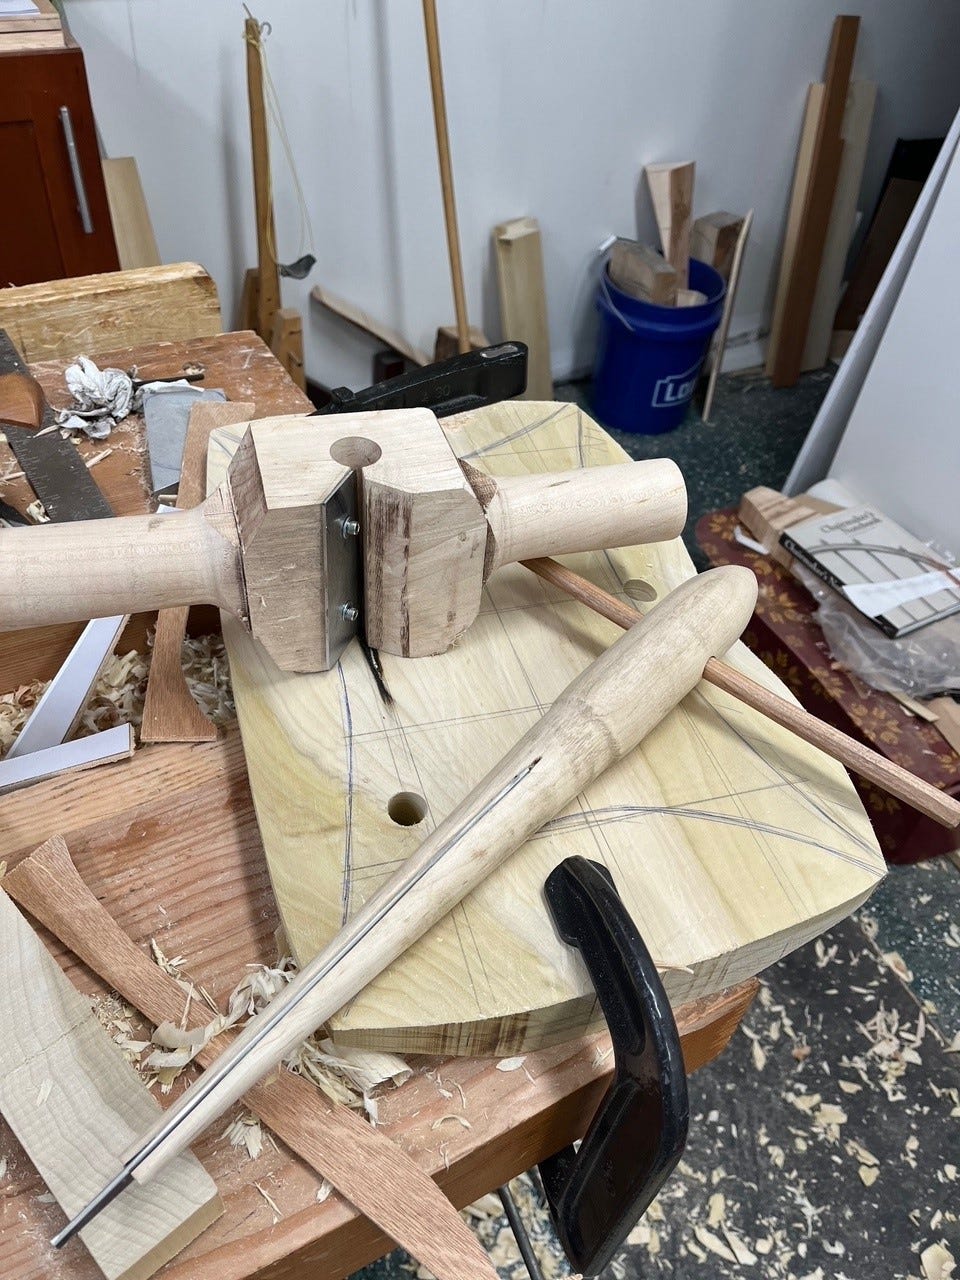
The legs and undercarriage of Windsor-style chairs comes together all at once in about 15 minutes. It goes from a pile of parts on the workbench to a proper chair which takes up volume. During the dry fit, I line up the growth rings of the legs and seat so that they’ll swell and shrink together as the humidity changes with the seasons. I drill holes for the rear and center stretchers, and turn the stretchers to the right length. The stretcher ends are 5/8” in diameter, and fit snugly into a 5/8” hole drilled 1” deep. This requires a special drill bit to drill a clean hole in a sloped curved surface. After the undercarriage is fit together, I flex the three legs to fit into the mortises (holes) in the underside of the seat. Once it all fits, it time for gluing and wedging the legs. I cut 3 cherry wedges and slots for them to go into on the top of the legs.
I warm up a small dish of hide glue (collagen boiled from skins, tendons, and bones of animals) to 140F using a mug of boiling water. I brush the runny glue into the holes and dip each stretcher end into it. It’s forgiving and I have about 20 minutes to work with it before it cures. I put hide glue on one side of each wedge and drive it into the top of the leg tenon. I mallet the seat down gently, then pound in the wedges with a hammer. The tenons splay out slightly and tighten into their seat mortises.
Hide glue is also great because it can be easily wiped off with cold water, and won’t stain the piece such that it won’t take a finish. Unlike most modern wood glues or epoxies, it can be warmed with a heat gun and parts can be loosened, even after centuries. This makes repairs easy.
Step 7: Fitting and Turning the Stretchers
Compared to cabinet-making, Windsor-style chairs involves very few right angles, if any. I can only count 2 in this entire chair:
The rear legs meet the bottom of the seat at 90 degrees, from the side view only. This is known as the rake. The leg still splays outwards for a wider base.
The center stretcher meets the rear stretcher at 90 degrees.
There are no other square angles between reference lines, planes, or parts. Truth be told, this style of chairmaking is forgiving. With so many curves and tilts, you won’t notice if a joint or surface is a few degrees off. You will notice if it’s not smooth, symmetrical, or level to the floor. In the absence of straight lines and square angles, your eyes naturally look for symmetry, flow, and balance. Do the legs look solid, but not stupidly oafish? Does it look stable or too fragile, and will guests be afraid to sit in it? It’s often hard to describe why a surface looks wrong, but you know it is when you see if and run your finger by it. This is where the art comes in.
For example, note the side edge of the seat, which tapers to about a 3/8” as it curves around the stool. Any thinner, and it looks and feels too sharp- it might chip if it falls over and catches the corner of a wall. Any thicker, and it would make the chair feel top heavy and unbalanced. Note that underside is carved out like the archways of a gothic cathedral. This adds to the lightness of the seat when you look at it from far away, but note that the carving stops where the legs enter the seat. The chair is more stable when the leg tenon has more contact with the thickest part of the seat.
The legs need to rake and splay out to keep the chair from tipping over. The leg base should not be so wide that it takes up more floor space than it needs. Note where the legs thicken to accommodate the stretchers. The stretcher takes up the middle third of the leg thickness. Any more, and it might weaken the leg.
The stretcher joints need to be tight. I did this by turning the stretchers slightly oversize to the 5/8” hole. I then sanded them slightly, and pounded them into a 5/8” hole into a hard maple block. This compresses the tenon fibers of the stretcher, which will expand into the hole in the leg as it absorbs the moisture of the hide glue.
The order of operations matters here. I fit the rear stretcher first, and then measure the distance between the rear stretcher and the front leg. I turn the center stretcher to fit it, and make it a little longer just in case. It’s easier to cut wood off than to add wood.
Step 6: Turning the Legs
Turning round parts on a wood lathe is one of the enjoyable parts of woodworking. I have not spent much time with the lathe yet. The lathe is one the most versatile tools ever. It is what started the industrial revolution. The lathe enabled the production of axles, gears for rotating machinery and most importantly the lead screw. In the 1750s, Antoine Thiout added a lead screw to a lathe, which enabled the production of more lead screws. The lead screw led to a host of precision machining operations, which lead to more precise machines.
The lathe is also one of the most dangerous tools in the shop, as your hands and sharp tools are close to a fast spinning object. I wear eye protection, ear protection, and a facemask.
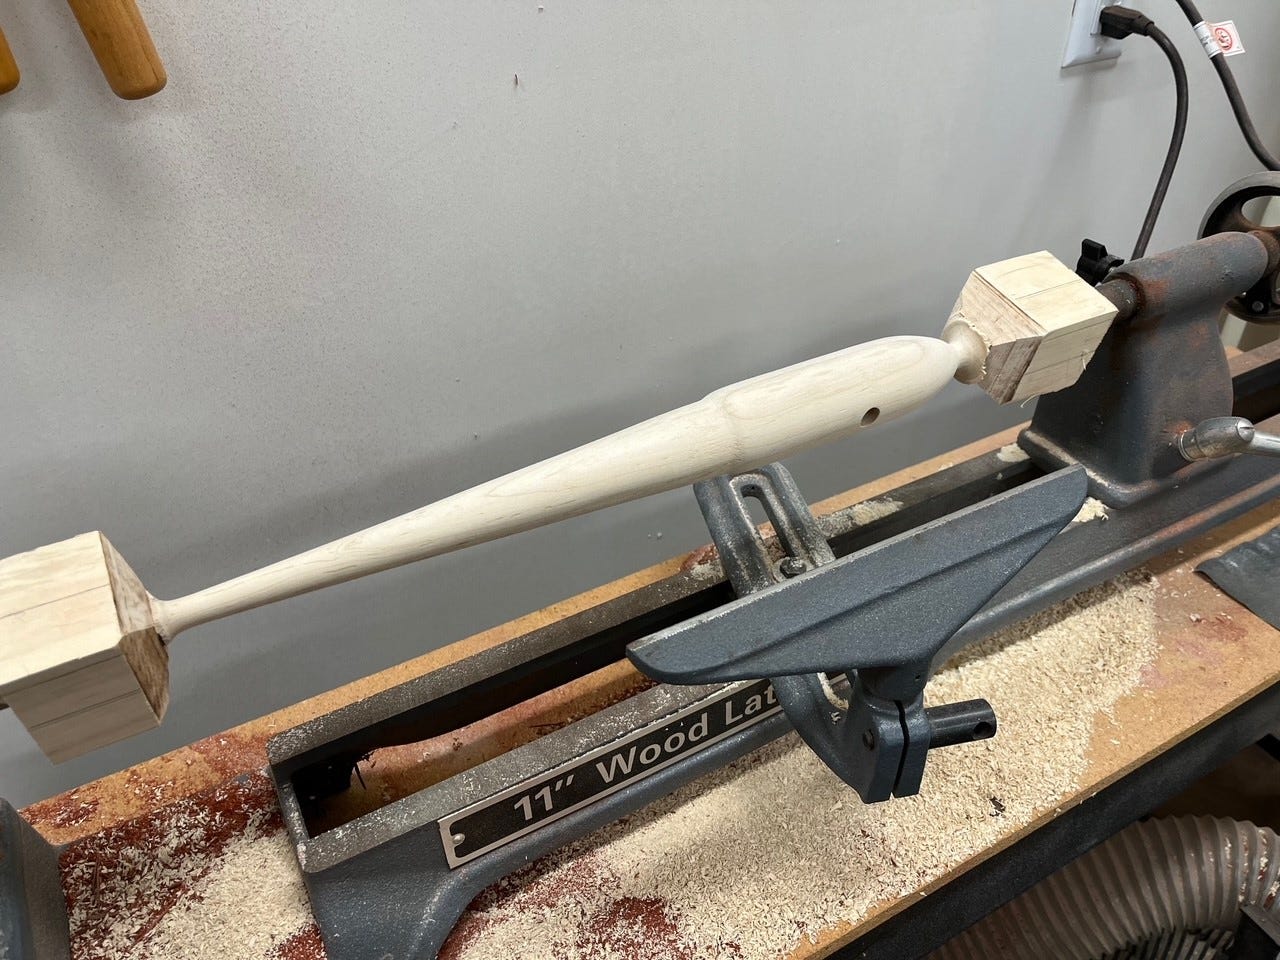
The lathe, more than most hand+machine tools, requires a feel to know when the turning gouge is properly biting the stock, and taking off a clean shaving. Too much contact and you will rip out wood or catch the tool in an exciting way. Too little contact and you will shaving the wood, and will be doing so all day. Keeping the gouge sharp is essential.
Chucking the stock into the lathe also takes some tricks, especially in softer wood. I was burning the tailstock end with friction until I figured out that I had to cut some off to expose a new surface to chuck, while leaving some of the original chuck hole to index the stock to the original center.
I need a lot more practice on the lathe. A good turner can use a gouge to make a finish-ready smooth surface. I still need multiple grits of sand paper to take out the gouge and tool marks.
Step 5: Reaming the Leg Holes
The tenons on the legs are actually cone shaped at 6 degrees (included angle). They fit snugly into cone shaped holes in the underside of the seat. These cone shaped holes start as normal 5/8” straight holes that are reamed into a cone shape. I made a reamer out of maple by turning a cone on the lathe, then cutting a slot out with a band saw, and inserting a triangular steel blade cut out of a 10” table saw blade. I put an edge on both sides of the blade with a belt sander and honed it with a grinder and diamond pad. The blade is held by friction inside the wooden holder as a small angled screw turns to advance the blade. This tool is simple, but it took me 3 tries to make correctly.
I used a reamer in Peter Galbert’s shop and copied chair and toolmaker Elia Bizzarri’s design. These tools started out as sketches to work out the order of operations. The tricky part of making the reamer is how to clamp down the reamer once it’s been turned into a cone. It’s also hard (and slightly dangerous) to cut a slot for the blade into a slippery cone with a bandsaw. After messing up a couple nice blocks of wood, I finally got it right.
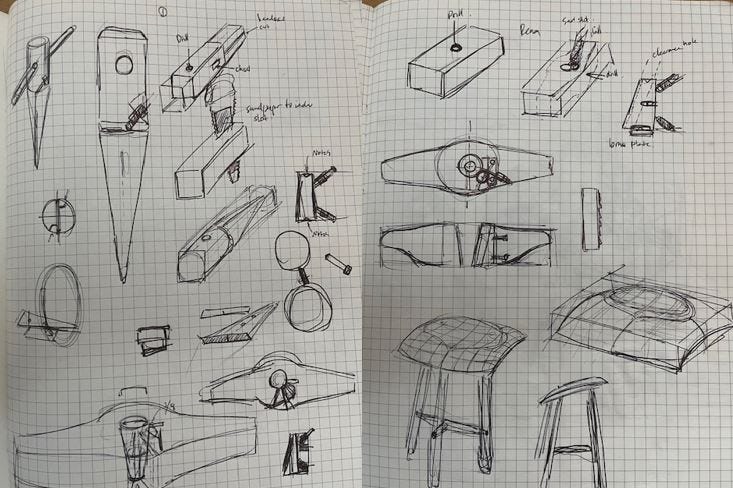
I then needed to make a tenon cutter to sharpen the end of the leg into a 6 degree cone to match the 6 degree reamed hole. This tenon cutter is essentially a giant pencil sharpener. It has a conical hole with a cutter mounted on one slice, and a relief slot for shavings to come out. I used a beefy block of hard maple which we cut down from our yard a few years ago. I drilled a 1/2” hole through the block and turned two hands on the lathe. I then used my reamer to ream the hole into a 6-degree cone. The beauty of this is that the tenon cutter’s cone exactly matches the cone of the reamer which created it. The future leg tenons will match the seat holes which I ream. These two tools will always travel as a set, and they are never more than a few feet apart from each other.
The hardest part of making the tenon cutter was mounting the blade. These can’t simply be screwed into the wood. The wood would give and the blade would slide out from its tuned position. I needed to screw threaded inserts into the wood to accept machine screws, which would hold the blade down securely. After breaking 5 brass inserts that I tried to screw in with a flat head screwdriver, I ordered steel threaded inserts and screwed them into the side face of the cone with a metric Allen key. I made 3 tenon cutters before I got it right. They are not pretty, but they work well, and I now know the subtleties of what makes a good reamer and tenon cutter.
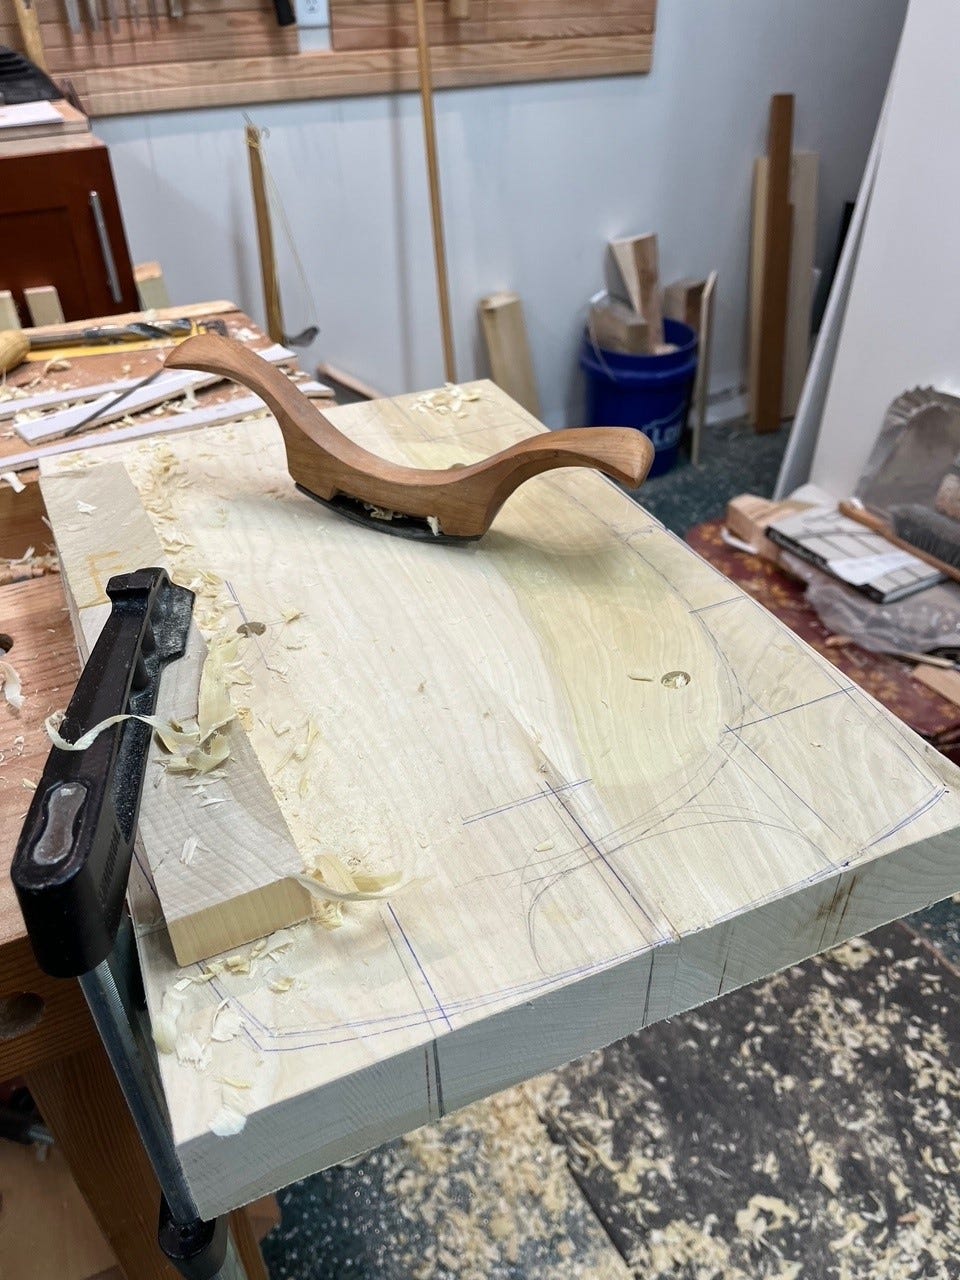
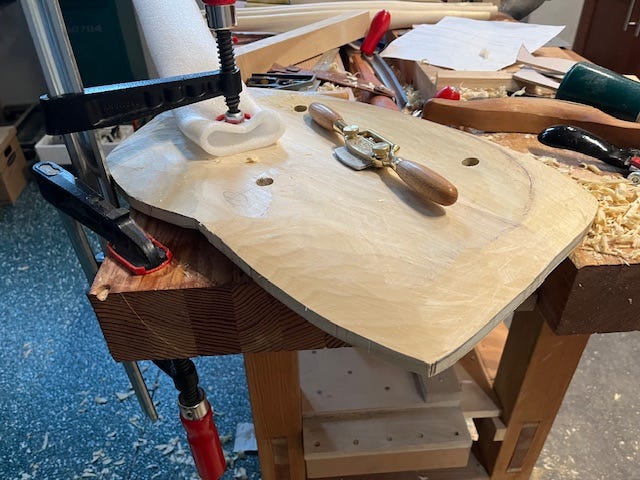
Step 4: Rough and Fine Seat Carving
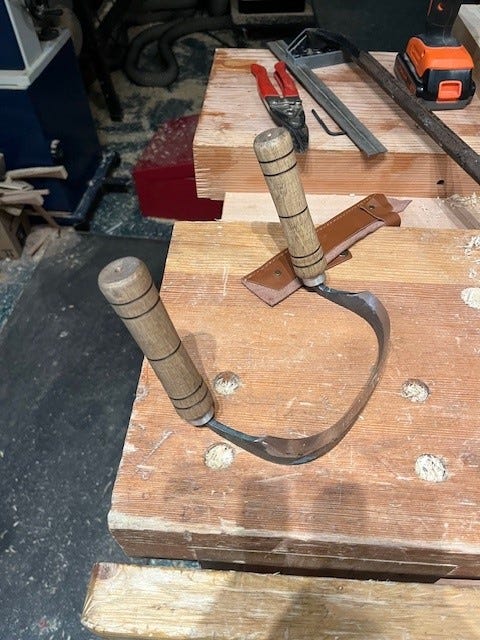
Now let’s talk about a beautiful hand tool: the travisher. This tool is for fine carving the concavity of a seat. It does so with a curved (4-1/4” radius) blade that can also rock back and forth. A brass shoe in front of the blade presses down the fibers to be cut, and the curved blade takes a shaving off. While it is tempting to pull on the wings or ears of the travisher, you hold it by pinching it with your thumb in the back, and two fingers in the front. You push it along the curve, skewing it to shave a tighter or shallower curve. You can rock the travisher backwards to expose more blade and take a deeper shaving, or rock it forward to expose less cutter and take a finer shaving.

I bought this blade and brass shoe from Claire Minihan, a craftsman and tool maker who sells finished travishers for $500. Her wait list is about 6 months long. Alas, I bought the blade for far less, and wanted the challenge of mounting it into the graceful curves of this tool. The travisher has been around for centuries, though this particularly exquisite one was designed by Peter Galbert. (Claire’s toolshop is down the hall from Peter’s chairmaking studio and classroom in an old mill building in South Berwick, Maine.) I didn't get the curves exactly right, but I got the right feel, and it works.
The travisher is the most beautiful of all the hand tools. It should not be enjoyed on a mantle display of heirloom tools. It should be enjoyed by using it to carve all sorts of concave curves.
The travisher is for cleaning up rough-hewn bowls and concave surfaces. Like a spokeshave or finishing plane, it takes a shaving a few thousands of an inch thick, or about as thick as paper. To do so, it must be sharp. Hand tools should be sharpened and honed every few hours of use. Some carvers strop their knives every 10-15 minutes. The blade should be taken out, carefully ground with 1-2 grits, and then honed with polishing compound on wood or leather strop. Back in the day, apprentices might sharpen the tools of their masters for years before being allowed to use those tools. Independent craftsmen might spend 10-15% of their time sharpening their hand tools. Back then, there was some knowledge of heat treating and metallurgy to make some good tool steels, but nothing compared to the high speed steels and carbide cutters of today. A good tool steel is resistant to wear and its teeth or edge won’t easily dull during the cutting action. It is tough and won’t fracture easily when it hits something hard or is accidentally dropped. It is also hard and won’t bend easily despite exposure to repeated stress. It is heat resistant and won’t lose its temper when heated by friction. Tempering is the heat treating process after quenching (rapid cooling after heating to red hot), which relieves stress and makes the blade tough and not brittle. This is where the term, “losing your temper” comes from. A future post will go down the rabbit hole of metallurgy and how clever humans are.
Sharpening flat chisels and plane irons is relatively straight forward. I put them in a rolling jig and slide the cutting edge across a steel plate with diamond dust embedded in it. After going through 4 successive grits, I pull the chisel across a leather with polishing compound. I test the sharpness by shaving a few hairs off my left arm. There is a whole science to getting things sharp, and it’s a fascinating rabbit hole.
All this to say, sharpening the curved blade of a travisher is tricky, and I’ve only done it once. I’m not actually sure I made it any sharper, but I didn’t make it worse or ruin the edge. I’m afraid to mess up the blade. I’ve ordered another blade to make a new travisher just in case. I also will start forging my own curved travisher blades and brass shoes because… why not?
Speaking of forged tools, the bowl of the seat of roughed out with an inshave (above), also known as a scorp. Compared to all the tools above, the scorp is a rather blunt instrument. I drag it across the grain at a skewed 45-degree angle and expose the curve of the hefty blade to scrape out fibers. I dig about 1/4 deep and outline the depth of the bowl. I purchased this from a Ukrainian blacksmith on Etsy. To make sure I am hogging out the seat to the right depth, I drill 9 holes to about 1mm above where their final depth needs to be. I then use the travisher to shave until there is no trace of these depth marking holes.
To shape the convex surfaces of the seat, I used a drawknife for slicing off large slivers. The drawknife is like a two handled katana where you can slice off 1/8” pieces splitting the grain as you go. I went from a rectangular block to this domes shaped seat in about 15 minutes, with the undersides roughed out as well.
The spokeshave is the fine instrument on the seat. The red handled drawknife lurks behind.
The drawknife can be wielded as a precise instrument, but generally leaves facets. To smooth the ridges between these facets, I used spokeshave, which takes a fine shaving. The Lie-Nielsen Boggs spokeshave is the right size and weight for chair seats.

I tried making my own spokeshave, but it doesn’t tune up properly to take repeated fine shavings. I’ll make a couple more and get it right. I need to make the blade out of thicker tool steel to accept countersunk machine screws, and also shape the brass sole to expose more blade. These are simple tools, but highly refined over centuries of craftsmen. The spokeshave was first used around the 16th century by wheelwrights.

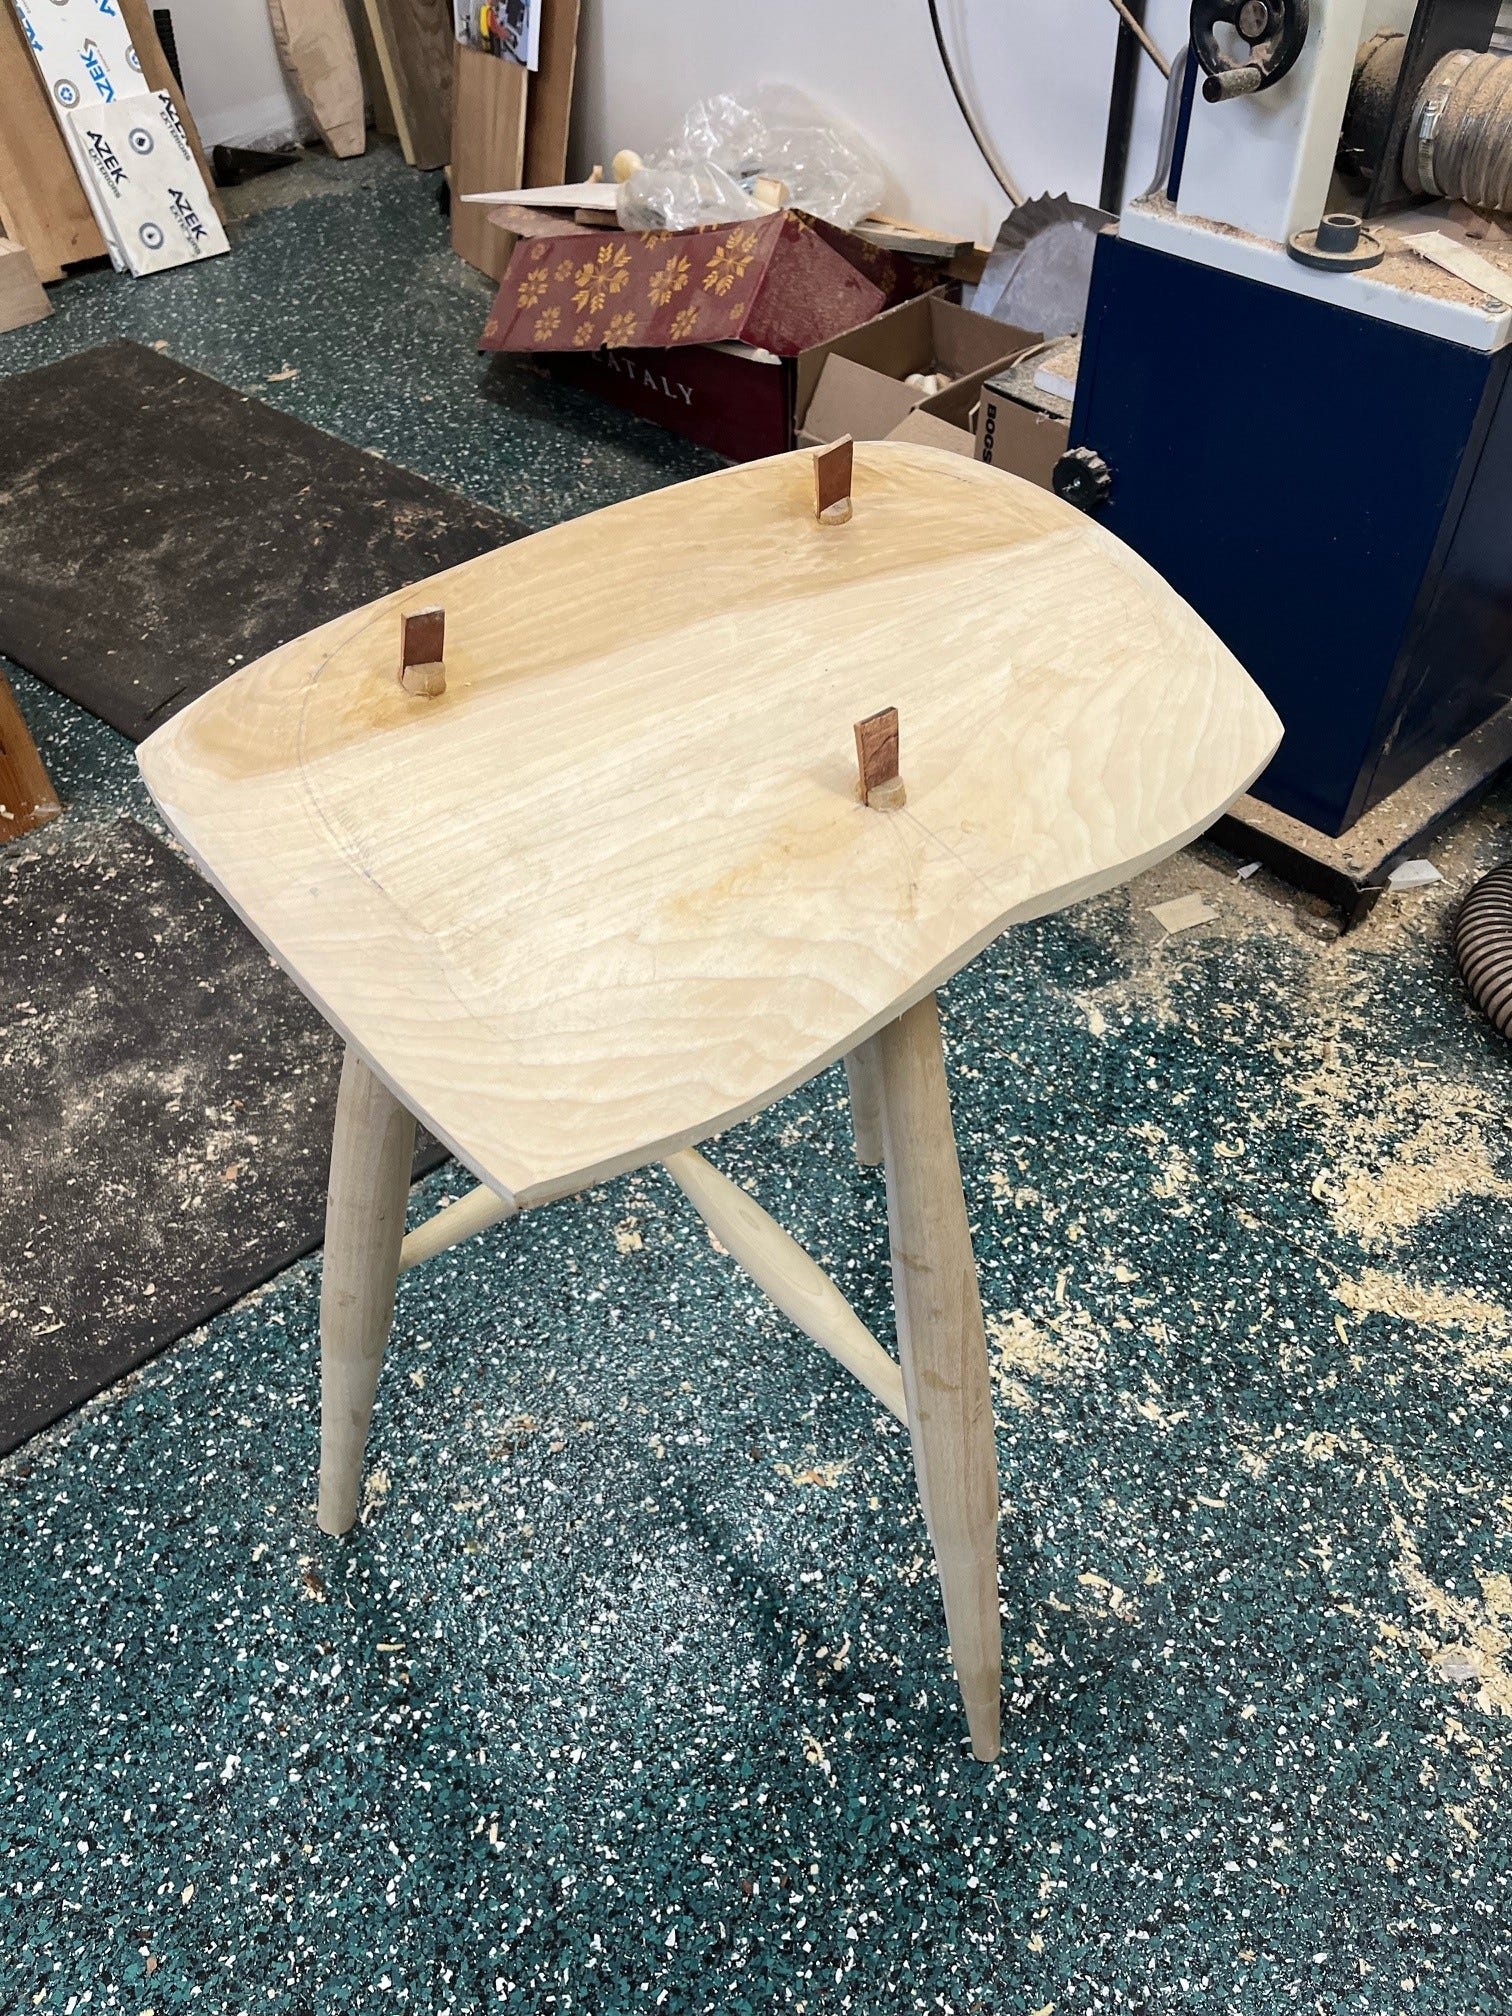
I keep working the convex edges and the concave bowl until these cross-sectional templates fit. These templates are printed 1:1 from the plans, and I glued them to plywood.
There is one more watchout when carving the seat: leave some flat spots on the top to clamp the seat while working on it. Hand tools require the workpiece to be securely held. It is possible to clamp a curved surface to the bench with a thick piece of felt to protect the carved surface from the clamp jaw, but nothing beats a flat surface which can be quickly carved away near the end.
Step 3: Drilling Leg Holes
I draw a grid on the rectangular seat blank and trace out the pattern. I mark out where the three legs need to go through the bottom, and at what angles. This is a complex angle to get the right rake (angle as seen from the side), and splay (angle as seen from the front). I set up two angle jigs to help guide me, and use an 8” drill-bit extension to help line up my drilling axis with the guide jigs. Even after all this, I’m a few degrees off on two of the legs. Not to worry- these are cylindrical 1/2” holes, and I still need to ream them out to 6-degree cones a few steps later after I’ve made some progress carving the seat. During reaming, I remember to ream with more pressure on one side and gradually pull the hole axis a few degrees over to where it needs to be.
Step 2: Selecting Wood
As this is my first chair, I’m using a relatively forgiving but still hard enough wood: poplar. Most people prefer the warm hues of cherry, oak, pine, and walnut. I do as well. Poplar’s green, gray, and purple do not have the coziness of even a light maple. I had a 2” x 6” plank of poplar left over, and it had excellent straight grain. I cut two 18” pieces and glued them together, noting the consistent grain direction. As the grain was relatively straight, I used a bandsaw to cut 2” x 2” stock for the turning the legs and stretchers. I could have used a froe, below.
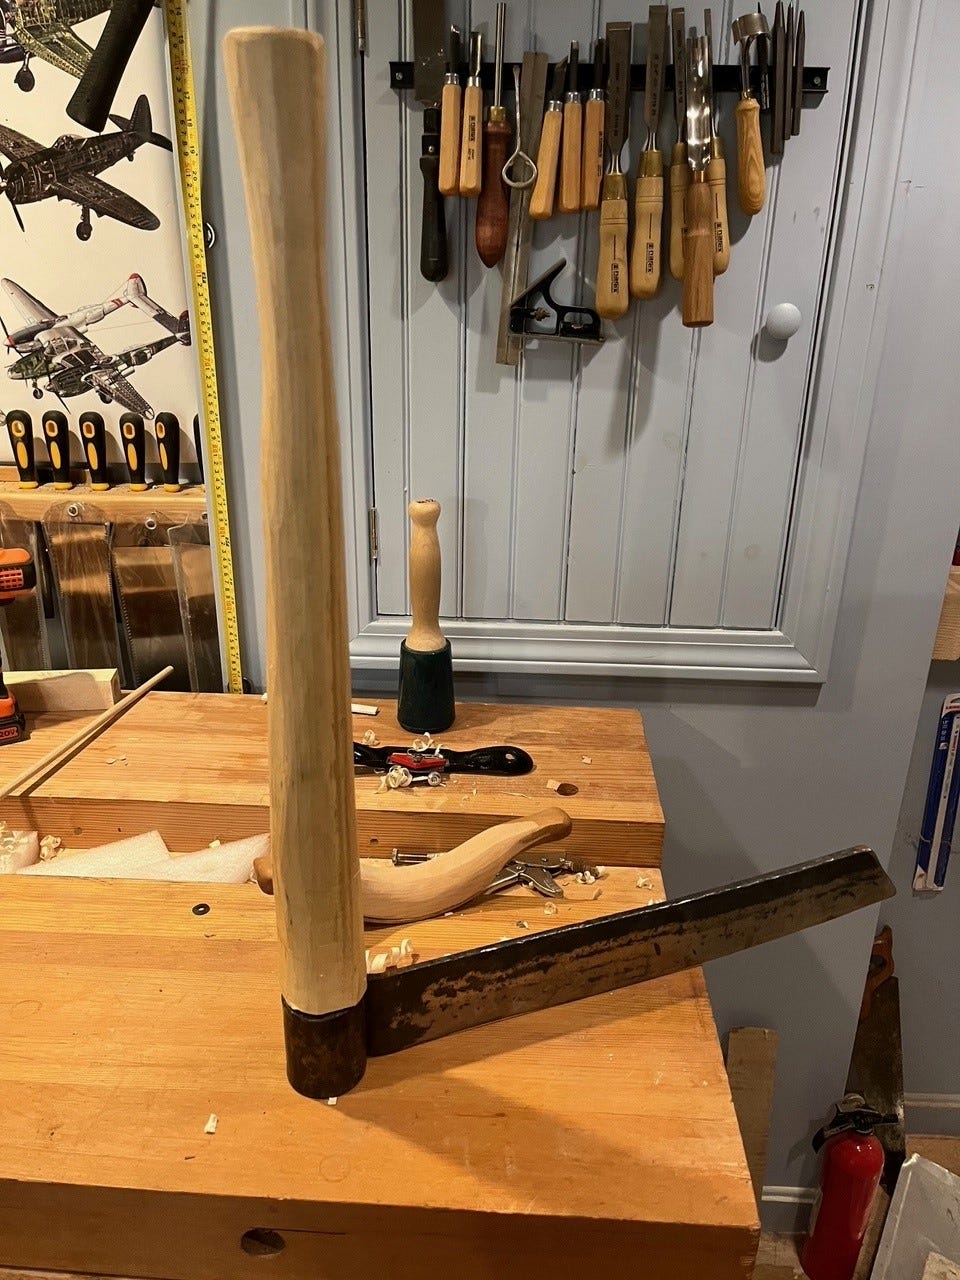
The froe is used to split wood along its grain. Doing so gives you strong parts which can be carved and steam-bent. These include spindles, rockers, and bows for bending into seat backs. I forged this froe from the leaf spring of a car. I use a large heavy club to hit the top of the froe, and steer the blade through the wood with the handle. It’s a blunt tool that uses wedging action which splits grains, rather than sawing action which cuts grains. Long, unsplit grains give chair parts their strength. It’s easy to build a sturdy, beefy chair. It’s tricky to build a sturdy chair that is light.
For this stool, I used poplar from my nearby lumber yard. That said, I’m learning how to harvest wood from trunks. Last weekend, a friend and I harvested 5” slabs from a 36” wide white oak tree. We took turns free-handing with a chainsaw. Cutting through 16” of 8 ft of oak took about 35 minutes per pass. It was a workout. The advantage is we could quarter-saw this trunk as we wanted, and get the best cuts for both beauty and stability of the grain over seasons. While it took some work, it’s rewarding to start from a tree.

Chairmaking links two organic ends. On one end, you start with a large tree with its variable fibers, grains, and rings. It is hard and sturdy. Each tree is similar, but unique. On the other end, you make structure to hold a human comfortably. This human comes in all sorts of shapes and sizes. The human is soft and comfort-seeking. The all-wooden chair is, I think, the most personal of all furniture. Unlike a table or desk, it contacts your hind parts, and you spend a lot of time in it. It doesn’t have cushions, but relies on sculpted shape to achieve its goals. It’s easy to make a bad chair. It’s a worthy pursuit to learn how to make a good chair.
Step 1: Plans and Planning
Out of respect for the designer, I purchased a set of Peter Galbert’s plans rather than try to reverse engineer it myself. Here’s an example of one of the sheets, with fuzzed out detail. The real nuggets are the cross section templates for the seat, and the rake and splay angles.

If I were a proper chair-making apprentice back in the day, I might make 100 of these perch stools to master basic joinery and seat carving skills. In between, I’d be watching the master in the shop to pick up the skills to make more complicated spindle and balloon back chairs.
Instead, I’m a weekend woodworker, but I do have my own shop at home. It’s a small 14’ x 17’ space, well-lit, insulated, and with tall ceilings. I can work comfortably all year round. In it, I have all the tools I need, and can make any jigs and most of the tools I don’t have. I spend most of my time behind the right side of this split-Roubo style workbench. From this spot, 80% of the tools I use for chair making (and most other projects) are within 4 ft. I use the bandsaw on the right, and the wood lathe, belt sander, and grinder for sharpening turning gouges.
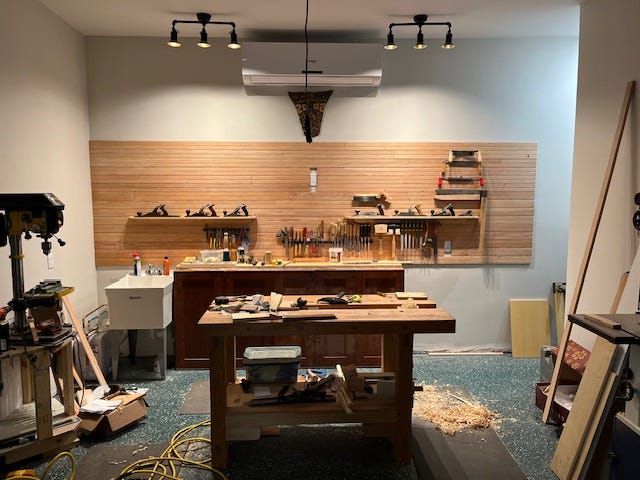
The shop has natural raking light from 3 windows on the left, and smells of fresh wood shavings. Where I stand, there’s usually a crunch of shavings under my feet. Using hand tools generates shavings. Using machine tools and motors generate dust. I set up shop to do more of the former.
Step 0: The Class
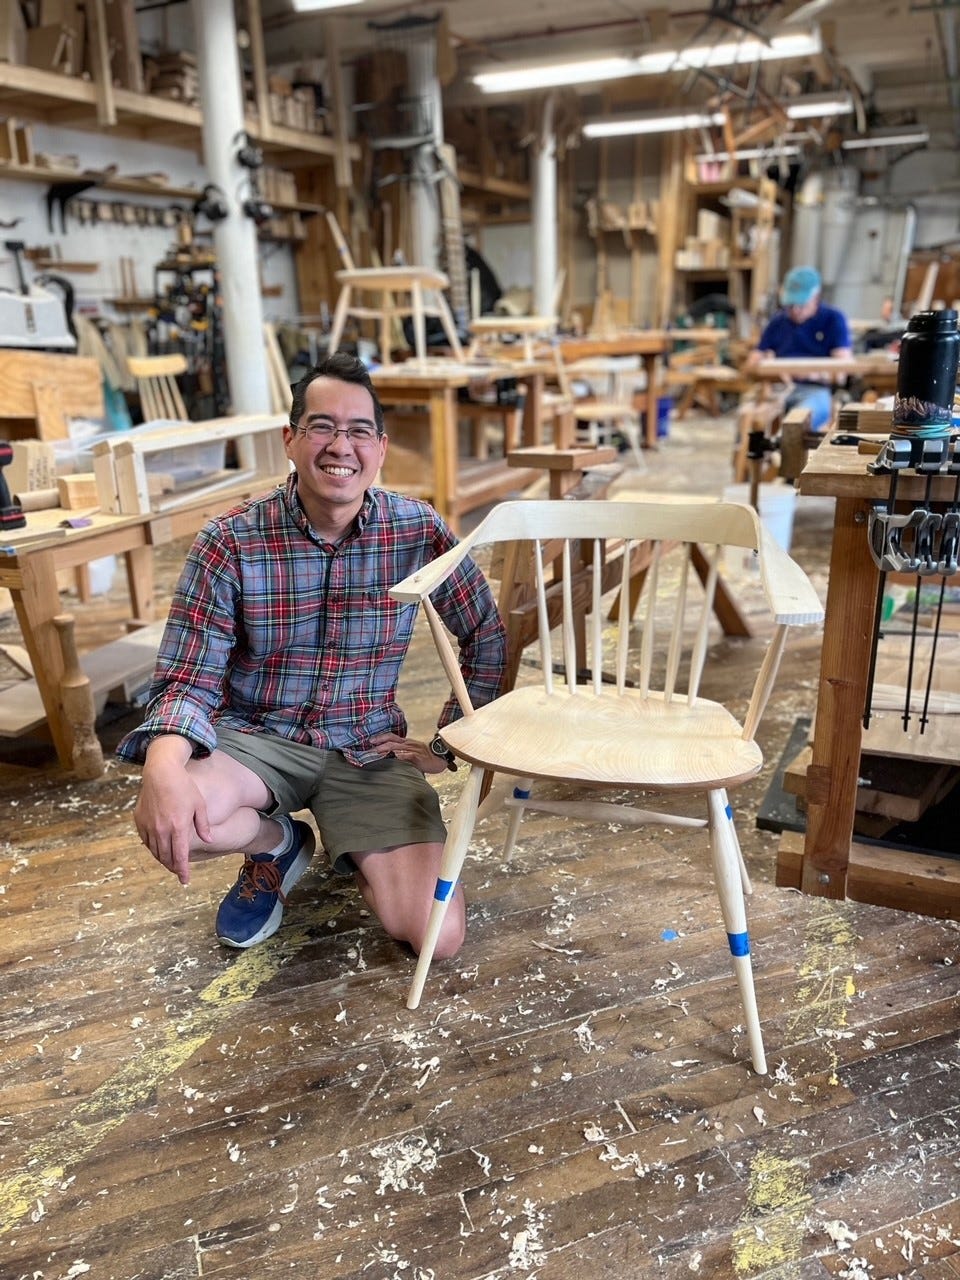
In Peter Galbert’s workshop. We made this Helix chair over 7 days. In the back is Julia’s Uncle Jimmy- an accomplished woodworker and craftsman who I enjoyed taking the class with.
A few years ago, my friend and then colleague Vincent gifted me a book: The Chairmaker’s Notebook by Peter Galbert. Vincent and I often talked woodworking. Vincent is a far better craftsman than I. When Vincent visited Boston, we drove up to Maine to visit Peter Galbert in his shop. During the visit, I sat in the perch stool for the first time. I also saw this “helix” chair which Peter was refining. My bucket list is not long, but taking a class with Peter was on it. In 2022, Peter announced that he would be teaching a class to make the helix chair. I signed up with Julia’s uncle Jimmy. In it, we learned how to steam bend wood, turn legs, fit Windsor joinery, carve spindles on a shaving horse, and carve seats. Most of all, I saw a master at work, and how good you can be at doing something, and teaching something. Seeing Peter wield a drawknife and carve a seat within minutes has changed my outlook on crafting. Seeing him turn a finished leg in 3 minutes without sand paper is also inspiring to know that it is possible with enough practice.